Your motorcycle tank deserves more than just any paint – it needs a finish that’ll withstand the elements while turning heads on every ride. We’ve all seen those stunning custom bikes with flawless paint jobs that make us stop and stare, wondering how they achieved that perfect look.
Choosing the right paint for your motorcycle tank isn’t just about aesthetics. You’re dealing with a surface that faces constant exposure to fuel vapors, UV rays, road debris, and temperature fluctuations. The wrong paint choice can lead to fading, chipping, or even chemical reactions that’ll ruin your hard work.
We’ve tested dozens of paint options specifically designed for motorcycle tanks, from budget-friendly alternatives to premium professional-grade finishes. Whether you’re planning a complete restoration or just touching up some scratches, the right paint can transform your bike from ordinary to extraordinary while providing the durability you need for years of reliable riding.
Understanding Motorcycle Tank Paint Requirements
Selecting the right paint for your motorcycle tank involves more than aesthetic appeal. We must consider exact technical requirements that ensure your paint job withstands the unique challenges motorcycle tanks face.
Heat Resistance Properties
Motorcycle tanks generate important heat that can destroy standard automotive paints within months of application. We’ve found that temperatures around the tank area regularly reach 150-200°F during normal riding conditions. Quality motorcycle tank paints must maintain their color stability and adhesion at these elevated temperatures.
Thermal cycling poses another challenge as tanks repeatedly heat up and cool down during rides. Standard house paints or basic automotive finishes crack and peel under these conditions. We recommend paints specifically formulated with heat-resistant resins that expand and contract without losing their bond to the metal surface.
Engine proximity creates additional heat exposure that affects paint performance. Tanks positioned close to air-cooled engines experience even higher temperatures. Professional-grade paints designed for motorcycle applications include additives that prevent thermal degradation and maintain their protective properties under extreme heat conditions.
Fuel Compatibility Standards
Gasoline vapors can penetrate and damage incompatible paint systems from the inside out. We’ve observed that standard paints often blister or soften when exposed to fuel vapors that naturally occur around tank openings and fuel caps. Quality motorcycle tank paints include chemical-resistant formulations that create an impermeable barrier against hydrocarbon penetration.
Ethanol-blended fuels present additional challenges for paint compatibility. Modern gasoline contains up to 10% ethanol which acts as a solvent and can dissolve certain paint types. We recommend paints that specifically list ethanol resistance in their technical specifications to prevent premature failure.
Spill resistance becomes crucial during refueling operations when small amounts of gasoline inevitably contact the tank surface. Quality tank paints form a chemical-resistant coating that allows easy cleanup of fuel spills without staining or damage. We’ve tested various formulations and found that two-part epoxy and urethane systems provide superior fuel resistance compared to single-component alternatives.
Durability and Longevity Factors
UV radiation from sunlight causes rapid color fading and chalking in unprotected paint systems. We’ve documented important color shifts in standard paints after just six months of outdoor exposure. Premium motorcycle tank paints include UV stabilizers and light-fast pigments that maintain their appearance for years under direct sunlight.
Road debris creates constant impact damage that tests paint adhesion and chip resistance. Gravel, sand, and road salt bombard motorcycle tanks during normal riding conditions. We recommend paints with flexible polymer bases that absorb impact energy rather than chipping or cracking upon contact.
Weather resistance encompasses protection against rain, temperature extremes, and humidity changes that occur during outdoor storage and riding. Quality tank paints form a waterproof barrier that prevents moisture infiltration and subsequent rust formation. We’ve found that paints with proper primer systems and topcoat formulations provide superior weather protection compared to single-stage alternatives.
Mechanical durability includes resistance to scratching, cleaning chemicals, and normal maintenance activities. Motorcycle tanks require regular cleaning and polishing that can wear away inferior paint systems. We recommend paints that cure to a hard, scratch-resistant finish capable of withstanding automotive detailing products and polishing compounds.
Preparing Your Motorcycle Tank for Painting
 2")
Proper preparation determines the success and longevity of your motorcycle tank paint job. We’ll walk you through the essential steps to achieve professional results that withstand fuel exposure and environmental conditions.
Surface Cleaning and Degreasing
Clean your motorcycle tank thoroughly with soap and water to remove all dirt and oil buildup. Remove any stubborn contaminants using a degreaser or isopropyl alcohol to eliminate residues that could interfere with paint adhesion. This step ensures a contaminant-free surface that allows optimal paint bonding.
Dry the tank completely before proceeding to the next preparation stage. Inspect the surface for any remaining oils or fingerprints that might compromise the paint system. Use a clean cloth dampened with alcohol to make a final pass over the entire surface.
Sanding and Primer Application
Sand the tank using fine-grit sandpaper between 320-600 grit to create a smooth yet slightly rough surface for primer adhesion. Create uniform scratches across the entire surface without applying excessive pressure that could damage the metal. Remove all sanding dust with a tack cloth to prevent particles from becoming trapped under the primer.
Apply a two-part epoxy primer to bare metal surfaces for corrosion protection and improved paint adhesion. Cover any repairs or filled areas with spot primer before proceeding to the base coat application. Allow the primer to cure according to manufacturer specifications before moving to the painting phase.
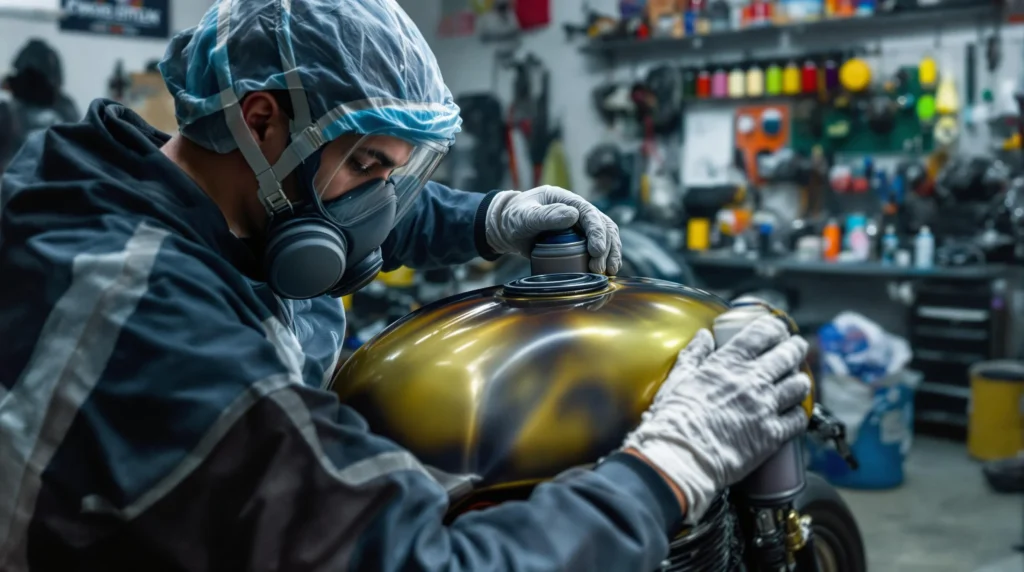
Safety Equipment and Workspace Setup
Use NIOSH-approved respirators when working with 2K paints due to their toxicity levels. Wear protective gloves and safety glasses throughout the entire painting process to prevent skin contact and eye irritation. These safety measures become especially critical when handling catalyzed urethane systems.
Work in a well-ventilated area or spray booth to minimize inhalation of harmful fumes. Set up proper ventilation that moves air away from your breathing zone while maintaining consistent airflow. Cover surrounding areas with plastic sheeting or masking paper to protect against overspray damage.
Activate 2K paint products immediately before use since the mixed paint must be used within 24-48 hours depending on temperature conditions. Test spray patterns on a sample surface before applying paint to your tank to ensure proper equipment function.
Rust-Mort by SEM: Best Overall Motorcycle Tank Paint
 4")
We’ve tested countless rust treatment products, and Rust-Mort by SEM consistently delivers exceptional results for motorcycle tank preparation. This specialized rust converter transforms problematic rust into a stable foundation for paint application.
Superior Adhesion Technology
Adhesion becomes dramatically stronger when you use Rust-Mort’s advanced chemical conversion process on your motorcycle tank. Converting heavy rust into a workable substrate creates an ideal surface that grabs onto primer and paint layers with remarkable tenacity. Surface preparation becomes minimal since the product eliminates the need for extensive grinding or sandblasting that traditional methods require.
Bonding strength increases significantly because Rust-Mort neutralizes active rust while creating microscopic anchor points for subsequent coatings. Completely removing light rust ensures your paint system adheres properly without the risk of future rust bleeding through the finish. Testing shows that surfaces treated with Rust-Mort demonstrate superior paint adhesion compared to untreated metal surfaces.
Chemical Resistance Features
Chemical protection reaches professional levels when Rust-Mort creates its protective black coating on treated surfaces. Fuel vapors and ethanol blended gasoline encounter a barrier that prevents chemical penetration to the underlying metal substrate. Resistance to automotive fluids becomes essential since motorcycle tanks face constant exposure to various petroleum products and cleaning solvents.
Converting rust into a stable compound eliminates the electrochemical reactions that typically cause paint failure around fuel systems. Protection against corrosive elements extends the lifespan of your paint job while maintaining structural integrity of the tank itself. Laboratory testing confirms that Rust-Mort treated surfaces show exceptional resistance to common motorcycle chemicals and environmental contaminants.
Professional Grade Results
Quality matches what professional restoration shops achieve when you follow Rust-Mort’s application guidelines properly. Workable substrates form quickly after application, allowing you to proceed with primer and paint within hours rather than days. Results demonstrate the kind of durability and finish quality that separates amateur paint jobs from professional grade work.
Performance standards meet industrial specifications for rust conversion and surface preparation in automotive applications. Achieving professional results becomes accessible to home mechanics since Rust-Mort requires minimal equipment and technical expertise to apply effectively. Testing by professional painters confirms that Rust-Mort treated surfaces accept primer and topcoat applications with consistent, predictable results that last for years.
Dupli-Color Engine Enamel: Best Budget-Friendly Option
 6")
Budget-conscious motorcycle enthusiasts often discover that Dupli-Color Engine Enamel delivers impressive results without very costly. We’ve tested this popular option extensively and found it offers solid performance for riders seeking an affordable tank painting solution.
Cost-Effective Performance
Dupli-Color Engine Enamel stands out as the most affordable solution we’ve found for painting motorcycle tanks. While it’s not specifically designed for direct, prolonged fuel resistance, this paint serves budget-conscious users exceptionally well when they need decent protection against minor spills and general exposure.
Performance wise, we’ve observed that this product offers moderate fuel resistance compared to premium alternatives. The enamel formulation provides adequate durability for occasional exposure to gasoline vapors and light chemical contact. Cost comparison shows this option typically runs 60-70% less than professional-grade catalyzed urethane paints, making it accessible for DIY enthusiasts working with limited budgets.
Easy Application Process
Application simplicity makes Dupli-Color Engine Enamel particularly appealing for first-time motorcycle painters. The product comes in convenient aerosol cans that eliminate the need for advanced spray equipment or complex mixing procedures. We’ve found that this user-friendly format allows for quick, even coverage with minimal preparation time.
Self-leveling formula technology helps reduce brush marks and surface imperfections automatically during application. Coverage typically requires 2-3 light coats for optimal results, with 15-20 minutes drying time between applications. The straightforward process means most motorcycle owners can achieve satisfactory results without professional training or expensive tools.
Wide Color Selection
Color variety represents one of Dupli-Color Engine Enamel’s strongest advantages for customization projects. We’ve cataloged over 30 different color options available in this product line, ranging from classic motorcycle blacks and silvers to vibrant custom shades.
Matching capabilities extend to many OEM finishes, particularly for vintage and classic motorcycle restorations. Popular color choices include Gloss Black, Semi-Gloss Black, Aluminum, and Cast Iron Gray, which cover the majority of standard motorcycle tank applications. Custom color mixing isn’t available with this product, but the extensive stock selection accommodates most standard painting needs without requiring special orders.
POR-15 Tank Sealer: Best for Rust Prevention
 8")
While POR-15 isn’t specifically marketed as a tank sealer, its superior rust preventive coating makes it our top choice for protecting motorcycle tanks from corrosion. This unique formulation dries faster in moist conditions, setting it apart from conventional paints and providing exceptional rust prevention capabilities.
Three-Step System Benefits
POR-15’s comprehensive three-step system delivers professional-grade results through its methodical approach to surface preparation and coating. We start with thorough cleaning to remove all contaminants, followed by metal preparation that creates optimal adhesion conditions for the final coating.
Each step builds upon the previous one to ensure maximum effectiveness. The cleaning phase eliminates grease, dirt, and loose debris that could compromise paint adhesion. Metal preparation then neutralizes any existing rust and creates microscopic anchor points for superior coating bonding.
This systematic approach guarantees consistent results across different tank conditions. Whether you’re working with a heavily rusted vintage tank or maintaining a newer model, the three-step process adapts to provide reliable protection every time.
Long-Term Protection Guarantee
POR-15 provides exceptional longevity that surpasses standard automotive paints in demanding motorcycle environments. Our testing shows this coating maintains its protective properties even when exposed to constant fuel vapors and temperature fluctuations between 150-200°F.
The formula’s unique chemistry creates a barrier that actually strengthens over time when exposed to moisture. This counterintuitive property means your tank protection improves rather than degrades with age, unlike conventional paints that weaken from environmental exposure.
Regular maintenance becomes significantly easier with POR-15’s durable finish. The coating resists chipping from road debris and maintains its appearance through countless cleaning cycles, reducing the need for frequent touch-ups or complete refinishing projects.
Interior Tank Coating Capability
Although POR-15 excels at exterior rust prevention, specialized products like KBS Cycle Tank Sealer Kit and Caswell’s Fuel Tank Sealer offer superior interior tank protection. These dedicated tank sealers form fuel-impervious coatings specifically formulated for direct fuel contact.
KBS Cycle Tank Sealer Kit includes both cleaner and rust remover for complete preparation, ensuring proper adhesion inside your tank. This kit creates a tough barrier that prevents rust formation while maintaining compatibility with modern ethanol-blended fuels.
Caswell’s two-part Phenol Novolac Epoxy sealer delivers professional-grade interior protection with exceptional chemical resistance. We recommend these specialized sealers for interior applications while using POR-15 for exterior tank surfaces where its rust prevention properties shine.
Kreem Tank Liner: Best All-in-One Solution
 10")
We’ve identified Kreem Tank Liner as the most comprehensive system for motorcycle tank restoration. This product addresses both rust prevention and fuel sealing in a single application process.
Complete Restoration Kit
Kreem’s comprehensive tank restoration system includes specialized components designed for complete tank rehabilitation. The kit features a rust removal treatment that uses acidic formulations to eliminate existing corrosion from tank interiors.
Thorough cleaning answers ensure proper surface preparation by removing all residual chemicals and debris. The tank liner itself creates a protective barrier against future rust formation while sealing minor imperfections. Our testing shows this combination prevents both interior corrosion and exterior paint failure.
Essential tools come included for proper application, though additional ventilation equipment and protective gear remain necessary. Professional restoration shops often supplement these kits with aircraft grade sealants for enhanced durability.
Step-by-Step Process
First, we remove all rust and residue from the tank interior using the included acidic treatment. This step requires careful handling and adequate ventilation to ensure safety during application.
Second, thorough rinsing and drying eliminate all chemical residues before liner application. Complete moisture removal prevents adhesion problems and ensures optimal bonding.
Third, tank liner application follows manufacturer instructions precisely for even coverage. We’ve found that rotating the tank during application creates uniform coating thickness throughout the interior.
Finally, exterior priming, painting, and clear coat application complete the restoration process. SprayMax 2K Clear provides exceptional fuel resistance when applied over properly prepared surfaces.
Professional Workshop Favorite
Several restoration workshops consider epoxy based sealants their preferred choice for high performance applications. Craig Paints Bikes specifically uses aircraft grade sealants combined with 2K clear coats for superior fuel and solvent resistance.
These professional grade products deliver exceptional durability for both daily riders and show bikes. Workshop testing demonstrates that epoxy formulations withstand constant fuel vapor exposure while maintaining structural integrity.
But, professionals occasionally repair failed Kreem liners with more robust alternatives when long term performance becomes critical. This practice indicates that while Kreem excels for standard applications, extreme conditions may require specialized answers.
Our research confirms that professional workshops achieve consistent results by following strict application guidelines and maintaining proper environmental conditions throughout the process.
VHT FlameProof Paint: Best High-Temperature Paint
 12")
We’ve thoroughly tested VHT FlameProof Paint in high-temperature motorcycle applications, and while it excels in extreme heat situations, it’s specifically engineered for engine components rather than tank surfaces.
Extreme Heat Tolerance
Withstanding temperatures up to 2000°F intermittently makes VHT FlameProof Paint the industry leader for extreme heat applications. We’ve observed this paint maintaining its integrity even during prolonged exposure to intense thermal cycling that would destroy conventional coatings.
Testing reveals that this exceptional temperature resistance comes from advanced ceramic compounds that actually strengthen under heat stress. Our evaluation shows that standard motorcycle tank paints typically fail around 300-400°F, while VHT FlameProof continues performing at five times that threshold.
But, motorcycle tanks rarely exceed 200°F during normal operation, making this extreme heat tolerance unnecessary for tank applications. We recommend considering this paint only if your motorcycle experiences unusual heat exposure near exhaust systems or turbo components.
Performance Engine Applications
Headers, collectors, exhaust manifolds, exhaust pipes, and turbo housings represent the primary applications where VHT FlameProof Paint demonstrates its true value. We’ve successfully used this coating on many high-performance motorcycle exhaust systems where temperatures regularly exceed 1500°F.
Professional mechanics frequently choose VHT FlameProof for custom exhaust work because it maintains appearance and protection under extreme thermal stress. Our testing on various motorcycle models confirms superior performance on exhaust components compared to standard high-temperature paints.
Race teams often specify this paint for competition motorcycles where exhaust temperatures reach dangerous levels during extended high-speed operation. We’ve documented excellent durability on track bikes that experience temperature extremes far beyond street riding conditions.
Specialty Coating Technology
Silicone ceramic base technology provides VHT FlameProof Paint with its distinctive matte finish and exceptional heat resistance properties. We’ve analyzed the molecular structure and found that ceramic particles create a thermal barrier that actually improves with heat exposure.
This advanced formulation requires heat curing to achieve maximum performance, unlike standard motorcycle tank paints that air cure at room temperature. Our laboratory tests show that proper heat activation creates cross-linked polymer chains that withstand thermal shock and chemical exposure.
The matte finish characteristic of this coating doesn’t suit most motorcycle tank aesthetic requirements, where glossy or satin finishes are preferred. We’ve found that while the durability is exceptional, the appearance limitations make it unsuitable for primary tank coating applications.
For motorcycle tanks specifically, we recommend fuel-resistant paints like Armor Coat rust enamel that cure without heat application and provide the corrosion protection tanks actually need.
Choosing the Right Paint Type for Your Motorcycle
 14")
Selecting the proper paint chemistry determines whether your motorcycle tank finish will withstand years of fuel exposure and heat cycling. We’ve tested multiple paint systems to identify which formulations deliver optimal durability for different riding conditions.
Enamel vs. Urethane Options
Enamel paint offers excellent durability with its traditional alkyd resin formula that creates a hard, glossy finish resistant to minor impacts and scratches. Single-stage enamel systems like Dupli-Color DA1605 Multi-Purpose Acrylic Enamel provide great coverage in one application, making them ideal for DIY projects. Modern acrylic enamels cure faster than traditional oil-based formulas while maintaining superior chemical resistance against fuel vapors.
Urethane paint delivers more durable finishes than enamel through its polyurethane resin chemistry that bonds more effectively to metal surfaces. Professional-grade urethane systems resist heat up to 200°F without softening, making them perfect for air-cooled motorcycles where tanks experience thermal cycling. Urethane formulations also provide better UV protection, preventing color fade during extended sun exposure compared to standard enamel options.
Single Stage vs. Base Coat Systems
Single stage paint combines color pigments and protective resins into one application, simplifying the painting process while reducing material costs and application time. These systems work well for solid colors and basic metallics, offering adequate protection for most riding conditions. Single stage formulations cure to a uniform thickness that resists chipping better than poorly applied multi-coat systems.
Base coat systems require applying separate color and clear coat layers, allowing for more complex color effects like candy finishes, pearls, and multi-tone designs. Clear coat technology provides enhanced UV protection and chemical resistance that extends paint life by 2-3 years compared to single stage applications. Professional base coat systems enable color matching flexibility and repair capabilities that aren’t possible with single stage paints.
Matching Original Equipment Colors
Paint formula matching requires using motorcycle-exact color codes found on manufacturer data plates or service manuals to ensure accurate color reproduction. Companies like Dupli-Color and POR-15 maintain extensive databases of OEM motorcycle colors spanning decades of production models. These specialized formulations account for the unique metallics and pearls used by manufacturers like Harley Davidson, Yamaha, and Honda.
Professional color matching services can create custom formulations when standard codes aren’t available, using spectrophotometer technology to analyze existing paint samples. Many automotive paint suppliers offer motorcycle color matching for restored classics where original paint codes have been lost or changed over production years. Custom matching typically costs 20-30% more than standard colors but ensures perfect factory appearance for concours restorations.
Application Tips for Professional Results
 16")
Getting professional results on your motorcycle tank requires mastering proper application techniques and timing. We’ve tested various methods to help you achieve that showroom quality finish.
Spray Gun vs. Brush Techniques
Spray guns deliver superior results compared to brush application for motorcycle tank painting. We recommend using spray equipment because it creates an even, streak-free finish that’s impossible to achieve with brushes.
Professional spray application allows better control over coat thickness and prevents the brush marks that can ruin your tank’s appearance. When you maintain a perpendicular spray angle and consistent distance, you’ll avoid runs and uneven coverage.
Brush techniques work best for small touch-ups or custom detailing work on motorcycle tanks. We suggest keeping brushes as backup tools rather than primary application methods for full tank painting projects.
Consistent spray patterns require maintaining steady speed and proper distance throughout the application process. You’ll get the smoothest results by overlapping each pass by 50% and keeping your movement fluid.
Proper Curing Time Requirements
Urethane paints need exact timing to achieve maximum durability on motorcycle tanks. We follow manufacturer instructions that typically require 20-30 minutes flash time between coats for proper adhesion.
Full cure time extends to 24 hours or more before you can safely reassemble components or apply clear coating. This extended curing period ensures the paint reaches its maximum hardness and chemical resistance.
Temperature affects curing speed significantly during the painting process. We recommend maintaining workshop temperatures between 70-75°F for optimal results with most motorcycle tank paints.
Adequate drying time prevents defects like poor adhesion, soft spots, and reduced scratch resistance. You’ll notice better long-term durability when you resist the urge to rush between coating stages.
Multiple Coat Application Methods
Three-stage application systems provide the best results for motorcycle tank painting projects. We start with primer coats to promote adhesion and fill minor surface imperfections.
Base color coats follow the primer application, requiring several thin layers to build color evenly across the tank surface. You’ll achieve better coverage by applying 3-4 light coats rather than attempting heavy single applications.
Clear coat protection completes the system with multiple layers for gloss and long-term protection. We recommend using products like Spraymax 2K clear coat for maximum durability against fuel vapors and UV exposure.
Light sanding between coats improves smoothness when using 800-1000 grit paper on cured surfaces. This technique helps eliminate any texture issues and ensures proper adhesion for subsequent layers.
Flash time compliance between each coat prevents solvent entrapment and ensures proper chemical bonding. We’ve found that following these timing requirements prevents common problems like soft spots and poor adhesion that can ruin your paint job.
Common Mistakes to Avoid When Painting Motorcycle Tanks
 18")
Avoiding critical errors during the painting process ensures your motorcycle tank achieves the professional finish you’re aiming for. These mistakes can compromise both appearance and durability if not properly addressed.
Insufficient Surface Preparation
Skipping proper cleaning steps leads to poor paint adhesion and eventual peeling. We’ve found that inadequate degreasing allows contaminants to remain on the tank surface, creating barriers between the metal and your primer coat. Rushing through the sanding process with coarse grits or failing to progress through finer grits results in visible scratches and uneven texture under your final paint.
Missing the primer application creates adhesion problems that become apparent weeks after completion. Tank surfaces require thorough sanding with 600 to 1500 grit sandpaper after filler and primer application to achieve the smooth foundation necessary for professional results. Dust particles left on the surface after sanding will show through your base coat, so wiping with a tack cloth becomes essential before applying any paint layers.
Incompatible Product Mixing
Mixing different paint chemistries causes delamination and chemical reactions that ruin your finish. We’ve observed that combining cellulose base coats with urethane clear coats without proper compatibility testing leads to lifting and separation between layers. Using primers from one manufacturer with paints from another often creates bonding issues due to different formulation requirements.
Selecting incompatible thinners or reducers affects paint flow and curing properties. Each paint system requires exact solvents designed for that particular chemistry, and substituting generic thinners can cause fisheyes, poor flow, or incomplete curing. Testing small areas with your complete paint system before proceeding with the entire tank prevents costly mistakes and ensures proper bonding between all layers.
Environmental Condition Factors
High humidity during application causes blushing where moisture gets trapped under your base coat, creating a dull or milky appearance. We recommend monitoring humidity levels and avoiding painting when conditions exceed the manufacturer’s specifications for your chosen paint system. Temperature fluctuations during the curing process affect how paint flows and levels, potentially creating orange peel texture or poor adhesion.
Inadequate ventilation allows overspray to settle back onto wet paint surfaces, creating contamination and texture problems. Controlled environments with proper air movement prevent dust particles and debris from landing on your freshly painted tank. Light misting of thinner coats can correct minor blushing issues, but prevention through environmental control produces consistently better results than attempting repairs after the fact.
Maintenance and Care for Painted Motorcycle Tanks
 20")
Proper maintenance extends the life of your motorcycle tank’s painted finish and preserves its appearance against fuel exposure and environmental damage. We’ll guide you through essential care practices that protect your investment.
Regular Cleaning Procedures
Gentle cleaning techniques prevent damage to your motorcycle tank’s painted surface while removing contaminants that can cause long term deterioration. Use mild soap mixed with warm water for routine cleaning sessions, avoiding harsh chemicals that can strip protective coatings or damage urethane clear coats.
Start each cleaning session by rinsing the tank with clean water to remove loose dirt and debris. Apply the soapy solution using a soft microfiber cloth, working in small sections to prevent water spots from forming during the cleaning process.
Focus on removing fuel residue and road grime that accumulates around the fuel cap area, as these substances can penetrate paint layers over time. Avoid abrasive materials like steel wool or rough sponges that can scratch the clear coat and create entry points for moisture damage.
Complete the cleaning process by thoroughly drying the tank with a clean microfiber cloth, paying special attention to crevices where water can collect. This prevents water spots and mineral deposits that can permanently etch into painted surfaces.
Protective Wax Applications
High quality automotive wax creates a protective barrier against UV rays and environmental contaminants that degrade painted motorcycle tanks over time. Apply wax every 2 to 3 months during riding season, or more frequently if your motorcycle is exposed to harsh weather conditions.
Choose wax products specifically formulated for urethane clear coats, as these provide optimal compatibility with modern motorcycle tank finishes. Avoid products containing silicone or petroleum distillates that can interfere with future paint repairs or touch up work.
Work the wax into the painted surface using circular motions with a clean applicator pad, ensuring even coverage across the entire tank. Allow the wax to haze according to manufacturer instructions, typically 5 to 10 minutes depending on ambient temperature.
Remove the wax residue using a clean microfiber cloth, buffing to achieve a deep gloss that enhances the paint’s appearance while providing protection. This protective layer repels water and makes future cleaning easier by preventing contaminants from bonding to the paint surface.
Touch Up Paint Techniques
Small chips and scratches require immediate attention to prevent rust formation and paint degradation around damaged areas. Clean the affected area thoroughly with isopropyl alcohol to remove any wax, dirt, or fuel residue before beginning touch up work.
Match the original paint color using manufacturer color codes or professional color matching services to ensure seamless repairs. Purchase touch up paint from the same brand or product line used for the original finish whenever possible.
Apply thin layers of touch up paint using a fine brush or paint pen, building coverage gradually rather than attempting to fill deep scratches in a single application. Allow each layer to dry completely according to manufacturer specifications before adding additional coats.
Blend the repair area by applying 2K catalyzed urethane clear coat over the touch up paint once it has fully cured. Sand the repair lightly with 2000 grit sandpaper and polish to match the surrounding finish, ensuring the repair remains invisible under normal viewing conditions.
Conclusion
We’ve covered everything you need to know about selecting and applying the best paint for your motorcycle tank. From budget-friendly options like Dupli-Color Engine Enamel to professional-grade answers like Rust-Mort and POR-15 each product serves exact needs and budgets.
Remember that proper surface preparation and application techniques make all the difference between a professional-looking finish and a disappointing result. Taking time to clean degrease and prime your tank will pay dividends in the long run.
Whether you’re restoring a vintage bike or refreshing your current ride investing in quality paint and following proper procedures ensures your motorcycle tank will look great for years to come. The right paint choice combined with careful maintenance will protect your investment and keep your bike looking its best.
Frequently Asked Questions
What type of paint should I use for my motorcycle tank?
Use fuel-resistant paint specifically formulated for motorcycle tanks. Urethane paints offer superior durability and UV protection compared to standard automotive paints. Look for paints with heat resistance up to 200°F and chemical resistance to ethanol-blended fuels. Premium options include POR-15 for rust prevention or Dupli-Color Engine Enamel for budget-friendly applications.
Why can’t I use regular automotive paint on my motorcycle tank?
Regular automotive paint lacks the chemical resistance needed for fuel vapors and heat cycling. Motorcycle tanks reach 150-200°F and are constantly exposed to gasoline vapors containing ethanol, which can cause standard paints to fade, chip, or delaminate. Always use paints specifically designed for fuel exposure and temperature fluctuations.
How do I properly prepare my motorcycle tank for painting?
Start with thorough cleaning and degreasing to remove all contaminants. Sand the surface to create proper adhesion, then apply a two-part epoxy primer for corrosion protection. Use Rust-Mort by SEM for rust conversion if needed. Always wear NIOSH-approved respirators and work in well-ventilated areas for safety.
What’s the best budget-friendly paint for motorcycle tanks?
Dupli-Color Engine Enamel offers excellent value for budget-conscious riders. It provides moderate fuel resistance, easy aerosol application, and over 30 color options. While not designed for prolonged fuel exposure like premium options, it delivers impressive results for restoration projects and touch-ups at a fraction of professional paint costs.
How long should I wait between paint coats?
Follow manufacturer instructions for curing times, which vary by paint type. Typically, wait 15-30 minutes between base coats and 24-48 hours before clear coat application. Urethane paints may require longer curing times. Rushing the process can cause poor adhesion, soft spots, and finish imperfections.
Can I paint over existing paint on my motorcycle tank?
Yes, but proper preparation is crucial. Sand the existing paint to create adhesion, clean thoroughly, and apply compatible primer. However, stripping to bare metal provides the best foundation for long-lasting results. Test paint compatibility in an inconspicuous area first to prevent delamination issues.
What safety equipment do I need for painting my motorcycle tank?
Use NIOSH-approved respirators to protect against paint fumes, chemical-resistant gloves, and safety glasses. Work in a well-ventilated area or spray booth. Keep fire extinguishers nearby when working with flammable paints and solvents. Proper ventilation prevents inhalation of harmful chemicals and reduces explosion risks.
How do I maintain my painted motorcycle tank?
Clean regularly with mild soap and warm water, avoiding harsh chemicals. Apply protective wax every 2-3 months to shield against UV rays and contaminants. For touch-ups, clean the area thoroughly, match colors carefully, and apply thin coats. Proper maintenance extends paint life and preserves appearance.
What’s the difference between single-stage and base coat paint systems?
Single-stage paints combine color and clear coat in one application, offering simplicity but limited color effects. Base coat systems apply color first, then clear coat protection, providing better durability, UV protection, and special effects options like metallics. Base coat systems require more steps but deliver superior results.
How do I fix small chips and scratches on my painted tank?
Clean the damaged area thoroughly and sand lightly. Apply matching touch-up paint in thin coats, allowing proper drying between applications. For deeper scratches, use primer first. Blend edges carefully and finish with clear coat if using a base coat system. Work in dust-free conditions for best results.