Diving into the industry of airbrushing can feel overwhelming when you’re just starting out. With countless models flooding the market, finding the perfect airbrush that balances quality, ease of use, and affordability isn’t always straightforward. But don’t worry—we’ve got you covered.
We’ve tested dozens of airbrushes specifically designed for newcomers to help you avoid the frustration of inappropriate equipment. Our comprehensive research has identified the top performers that combine user-friendly features with enough capability to grow with your skills. From gravity-fed options to dual-action triggers, we’ll walk you through everything beginners need to know.
Understanding the Basics of Airbrushing for Beginners
Before diving into exact airbrush recommendations, we believe it’s essential to understand what airbrushing actually involves. Airbrushing uses compressed air to spray paint or other liquid media through a precision instrument called an airbrush. This technique allows for exceptional control and detail that’s difficult to achieve with traditional brushes or spray cans.
Types of Airbrushes
Airbrushes come in several configurations, each with distinct advantages for beginners:
- Single-action airbrushes allow you to control only the airflow while the paint flow remains preset. These simpler mechanisms make single-action models more straightforward for newcomers to master.
- Dual-action airbrushes give you control over both air and paint flow simultaneously. Although they require more practice, dual-action airbrushes offer greater versatility and precision once you’ve developed basic skills.
- Gravity-fed airbrushes use a paint cup mounted on top of the airbrush. This design requires less air pressure and enables finer detail work, making them popular among artists and modelers.
- Siphon-fed airbrushes draw paint from a bottle attached below or to the side. These hold more paint, which means fewer refills during large projects like t-shirts or automotive work.
Essential Components and Features
Every airbrush consists of several key components that beginners should understand:
- Needle and nozzle determine the spray pattern size. Smaller needles (0.2-0.3mm) produce finer details, while larger ones (0.5-0.8mm) cover broader areas faster.
- Trigger mechanism controls how paint and air are released. Learning proper trigger control represents one of the fundamental skills in airbrushing.
- Air source provides the pressure needed to atomize paint. Most beginners start with small compressors designed specifically for airbrushing.
- Paint cup/reservoir holds your paint during operation. Cup sizes vary from small (perfect for detail work) to large (better for covering expansive areas).
- Mixing chamber is where paint and air combine before being sprayed. The design of this chamber significantly affects spray consistency.
Air Pressure Considerations
Understanding air pressure requirements proves crucial for proper airbrush operation:
- Typical working pressure ranges between 15-50 PSI depending on your application. Beginners often find 20-25 PSI works well for general use.
- Lower pressure (10-20 PSI) allows for finer detail work and thinner lines, ideal for model painting or detailed artwork.
- Higher pressure (30-50 PSI) helps when spraying thicker paints or covering larger areas quickly, such as in fabric painting or larger art pieces.
- Moisture traps prevent water condensation from reaching your airbrush, which can ruin your paint job. These are essential accessories for consistent results.
- Pressure regulators let you adjust and maintain consistent pressure, which dramatically improves your control and final results.
Key Features to Look for in Your First Airbrush

Selecting the right airbrush involves understanding several key components that affect performance and ease of use. We’ve identified the most important features beginners should consider before making their purchase.
Nozzle Size and Spray Pattern
Nozzle size directly impacts the level of detail you can achieve with your airbrush. Sizes typically range from 0.2 mm to 0.7 mm, with smaller nozzles producing finer lines and details. Beginners often find medium nozzles (0.3-0.5 mm) offer a good balance between detail work and coverage. The spray pattern varies based on the nozzle size—smaller nozzles create tighter, more precise patterns while larger ones produce broader coverage. For newcomers learning basic techniques, starting with a versatile 0.3 mm nozzle allows for practicing both detail work and larger area coverage without immediately investing in multiple airbrushes.
Trigger Control and Precision
Dual-action triggers represent the gold standard for airbrushing control and precision. These mechanisms allow simultaneous adjustment of both air and paint flow—pressing down controls air flow while pulling back regulates paint release. This design gives artists tremendous control over their work, enabling techniques from fine lines to smooth gradients. While single-action airbrushes (which only control air flow) might seem simpler, we recommend beginners start with dual-action models even though the slightly steeper learning curve. Mastering a dual-action trigger early builds better technique and eliminates the need to upgrade later as your skills advance.
Gravity Feed vs. Siphon Feed
Gravity-fed airbrushes feature a paint cup positioned on top of the tool, using gravity to deliver paint to the nozzle. This design offers several advantages for beginners including better paint flow at lower air pressures, more precise control, and easier cleaning. Siphon-fed models, which draw paint from a bottle attached below or to the side, excel at covering larger areas and allow for quick color changes. Most beginners benefit from starting with gravity-fed airbrushes due to their intuitive operation and superior control over paint flow. Brands like Iwata Neo and Badger Patriot 105 offer excellent gravity-fed options that provide the responsiveness new artists need while developing fundamental airbrushing skills.
Top 10 Best Airbrushes for Beginners in 2023

After testing dozens of models, we’ve compiled our top picks that balance quality, ease of use, and value for newcomers to airbrushing.
Budget-Friendly Options Under $50
Generic Battery-Operated Kits offer exceptional portability and affordability for beginners just testing the waters. These compact units provide a simple introduction to airbrushing techniques without requiring a important investment.
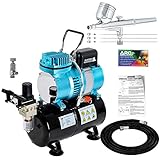
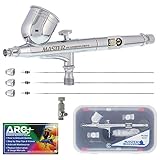
Master Airbrush G233 consistently ranks as Amazon’s top budget selection for beginners in 2023. We found its intuitive design makes first-time setup and cleaning remarkably straightforward, allowing newcomers to focus on developing their techniques rather than troubleshooting equipment.
Generic Mini Airbrush Kits deliver surprising versatility in compact packages. These starter sets typically include basic compressors with essential accessories, giving beginners everything needed to start practicing immediately without very costly.
Mid-Range Quality Airbrushes
Iwata Neo stands out as an exceptional entry-level gravity-feed model priced between $60-$80. The Neo delivers reliability and performance that approaches more expensive models while remaining accessible to beginners who can invest slightly more for better quality.
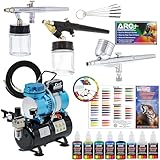
Master Airbrush Advanced Kit provides excellent value in the $100-$150 range. This comprehensive package includes both a reliable compressor and precise dual-action airbrush, creating a complete setup that eliminates guesswork for beginners.
Gaahleri Models have gained substantial popularity for their versatility across different painting applications. These affordable mid-range options balance quality components with beginner-friendly features that accommodate growing skills.
Generic Compressor Kits in the $80-$150 range offer solid performance for beginners serious about learning. These bundles typically pair entry-level airbrushes with dependable compressors, creating complete systems ready for immediate use.
Premium Starter Kits Worth the Investment
Harder & Steenbeck Ultra 2024 represents German engineering excellence with its high-precision performance. We appreciate its user-friendly maintenance design that makes cleaning and part replacement remarkably simple for beginners even though its premium positioning.
Iwata-Medea Eclipse combines durability with user-friendly operation in the $150-$200 range. The Eclipse series offers advanced beginners exceptional control and reliability that continues delivering value as skills progress beyond the novice stage.
Mr. Hobby PS-771 features a gravity-fed design optimized for detailed work. Industry experts often compare its performance favorably against premium Iwata Micron models costing significantly more, making it an excellent investment for beginners with precision requirements.
Most quality kits include compressors with essential moisture traps and adjustable PSI controls. Gravity-feed designs dominate our recommendations for their efficiency and reduced paint waste. Dual-action control mechanisms remain standard across better models, allowing beginners to master precise airflow and paint modulation simultaneously.

Last update on 2026-02-27 / Affiliate links / Images from Amazon Product Advertising API
Essential Airbrush Accessories for Newcomers

After selecting your airbrush, you’ll need several key accessories to enhance your experience and ensure smooth operation. These essentials will help maintain your equipment and improve your results from day one.
Compressor Recommendations
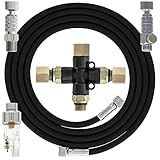
Finding the right compressor is crucial for consistent airbrush performance. Oil-free compressors are ideal for beginners as they require less maintenance and provide cleaner air flow. Look for models with adjustable PSI in the 15-30 psi range, which offers versatility for different painting techniques and mediums. Integrated moisture traps are essential for preventing water contamination that can ruin your paint job. We particularly recommend compressors with auto-shutoff features, such as the popular AS186-style models, which prevent overheating during extended use sessions. These smart systems automatically power down when pressure reaches maximum levels, extending the lifespan of your equipment while providing peace of mind during longer projects.
Cleaning and Maintenance Tools
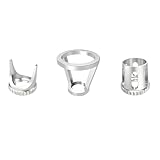
Proper maintenance tools will significantly extend your airbrush’s lifespan and performance quality. A dedicated cleaning pot captures overspray during flushing procedures, keeping your workspace clean and preventing paint mist from spreading. Pipe cleaners and interdental brushes are perfect for reaching internal channels and nozzles where paint residue commonly builds up. Nozzle reamers allow you to safely clear dried paint without damaging delicate components. Paint thinners or flow improvers like Vallejo Airbrush Thinner prevent frustrating clogs, especially when using finer nozzles. Quick-release couplers simplify detaching your airbrush from hoses, making cleaning sessions more efficient. Paint stirrers ensure consistent paint consistency before application. We also strongly recommend keeping spare needles and nozzles on hand to minimize downtime during inevitable clogs. Establishing a regular maintenance routine that includes thorough flushing after each session and monthly deep cleaning will significantly improve your airbrushing experience. Store your airbrush horizontally between uses to prevent unwanted fluid leakage and maintain optimal condition.


Last update on 2026-02-27 / Affiliate links / Images from Amazon Product Advertising API
Common Airbrush Techniques for Beginners to Master

After selecting the right airbrush like the Iwata Neo or Badger Patriot 105, mastering fundamental techniques will elevate your airbrushing skills. We’ve compiled five essential techniques every beginner should practice to build a solid foundation in airbrushing.
- Layering: Building up multiple thin layers of paint creates depth and dimension in your work. Start with light applications and gradually add more passes to achieve richer colors and smoother transitions. This technique prevents pooling or running of paint that often frustrates beginners.
- Blending: Creating seamless color transitions requires controlling air pressure and paint flow. Position your airbrush at a consistent distance from the surface and use smooth, steady movements to merge colors naturally. The Harder & Steenbeck ULTRA V2.0 with its precise 0.2mm nozzle excels at this technique.
- Stenciling: Using masks or pre-cut templates allows for precise shapes and crisp edges in your designs. Secure your stencil firmly against the working surface and spray lightly around the edges to prevent paint seepage. This technique is particularly useful for adding repeated patterns or text.
- Freehand: Painting without guides develops hand-eye coordination and artistic confidence. Practice controlling your airbrush’s distance, angle, and movement to create various line weights and patterns. The versatile Badger Patriot 105 with its interchangeable nozzles (0.3, 0.5, and 0.7mm) offers flexibility for different freehand applications.
- Wash: Applying diluted, transparent paint enhances details and adds subtle shading. Mix your paint with appropriate thinner and use low pressure to apply a light mist over your work. This technique brings out texture and definition, especially valuable for model painting and fine art projects.
Practicing these techniques regularly with any of our recommended beginner airbrushes will help you develop control and precision. Many artists find that dedicating exact practice sessions to each technique accelerates their learning curve and builds the muscle memory necessary for more advanced applications.


Last update on 2026-02-27 / Affiliate links / Images from Amazon Product Advertising API
Maintenance Tips to Extend the Life of Your Airbrush

Proper maintenance is crucial for keeping your airbrush performing at its best. We’ve compiled these essential care practices to help you maximize the lifespan of your investment, whether you’re using an Iwata Neo CN, Badger Patriot 105, or any beginner-friendly airbrush.
Clean Immediately After Each Use
Always flush your airbrush with the appropriate thinner or cleaning solution right after you finish using it. This immediate cleaning prevents paint from drying inside the mechanism, which can lead to clogs and performance issues. For water-based paints, running warm water through the system works well, while solvent-based paints require their exact thinners for effective cleaning.
Perform Weekly Deep Cleaning
Set aside time each week for a thorough disassembly and deep cleaning of your airbrush. Following your manufacturer’s guidelines, carefully take apart the needle, nozzle, and air cap components. Soaking these parts in the appropriate cleaning solution helps dissolve stubborn paint residue that regular flushing might miss. Special attention should be given to the nozzle, where tiny paint particles often accumulate.
Use Properly Thinned Paints
Thick paints significantly increase the risk of clogging your airbrush. We recommend following brand-exact thinning ratios to achieve the optimal consistency for smooth spraying. Testing the paint on a palette before loading it into your airbrush can save you from potential clogs and inconsistent spray patterns, particularly important for beginners using entry-level models like the Master G233 or Gaahleri airbrushes.
Lubricate Moving Parts Regularly
Apply a small amount of airbrush-exact lubricant to the needle and trigger mechanism to reduce friction between moving parts. This simple step prevents premature wear and ensures smooth operation of your airbrush. Most quality airbrushes come with recommendation charts for lubrication frequency, but generally, applying lubricant after every 5-10 thorough cleanings works well.
Store Your Airbrush Properly
Protecting your airbrush between uses is essential for preventing damage. Replace the protective caps on needles and nozzles before storing your airbrush in a dry place away from dust and moisture. Many artists invest in dedicated airbrush holders or cases to provide additional protection, particularly important for preserving the fine components of quality beginner airbrushes like the Iwata Neo.
Inspect Nozzles Regularly
Regular inspection of your nozzle helps identify wear or clogging issues before they compromise your spray consistency. Hold the nozzle up to a light source to check for obstructions or damage. Damaged nozzles should be replaced immediately, as they can cause irregular spray patterns and potentially damage other components of your airbrush system.
Avoid Harsh Chemicals on Seals
Never use aggressive solvents on the rubber seals and O-rings of your airbrush. These components can degrade when exposed to harsh chemicals, leading to air leaks and reduced performance. Instead, use manufacturer-recommended cleaning answers or mild soap and water for these sensitive parts to ensure their longevity.
Ultrasonic Cleaners for Stubborn Clogs
For particularly stubborn clogs that resist standard cleaning methods, ultrasonic cleaners offer an effective solution. These devices use high-frequency sound waves to dislodge dried paint from hard-to-reach areas within your airbrush components. While not essential for beginners, they’re worth considering if you frequently work with fast-drying or particle-heavy paints.
Troubleshooting Common Beginner Airbrush Problems

Every new airbrush artist encounters technical issues that can frustrate and slow down their progress. We’ve compiled answers for the most frequent problems you’ll face when starting out.
Dry Tip Issues
Dry tip occurs when paint dries at the needle tip, interrupting your spray pattern. This common problem typically happens due to insufficient paint thinning or inadequate cleaning practices. For best results, ensure your paint is properly diluted according to manufacturer recommendations. Regular needle cleaning during painting sessions will prevent buildup, especially when working with fast-drying acrylics. Try keeping a small container of cleaner nearby to dip your needle tip in whenever you notice inconsistent spray patterns.
Dealing With Clogging
Clogs represent perhaps the most frustrating challenge for beginners. Using a fine needle or appropriate cleaning tool to clear blockages works effectively for immediate fixes. Paint particles commonly accumulate in the nozzle and air cap, causing irregular spray patterns or complete blockage. Implementing a thorough cleaning routine after each session dramatically reduces clogging incidents. Properly thinned paint also flows more smoothly through your airbrush, minimizing the risk of obstructions.
Fixing Sputtering Problems
Sputtering produces uneven, splattered paint application that ruins detailed work. Incorrect air pressure settings frequently cause this issue, requiring adjustments to your compressor. Dirty or poorly maintained airbrush components contribute significantly to sputtering problems. Check that your air pressure matches your paint consistency—thicker paints need higher PSI while thinner mixtures work better at lower pressures. Thorough cleaning of the needle, nozzle, and air passages eliminates many sputtering issues immediately.
Correcting Inconsistent Spray Patterns
Uneven spray patterns make precise work nearly impossible. First, check the nozzle alignment to ensure it’s properly seated and not damaged. Incorrect assembly following cleaning often leads to alignment problems. Verify that all components fit together correctly, with special attention to the needle positioning relative to the nozzle. Air leaks from loose connections can disrupt airflow, creating inconsistent patterns. Regular inspection of O-rings and seals helps maintain proper pressure throughout the system.
| # | Preview | Product | Price | |
|---|---|---|---|---|
| 1 |

|
Master Airbrush Cool Runner II Airbrush Kit with Dual Fan Air Compressor, 8 Color Water-Based Face... | $129.99 | Buy on Amazon |
Last update on 2026-02-27 / Affiliate links / Images from Amazon Product Advertising API
Where to Buy Quality Airbrushes for Beginners

Finding reliable retailers for your first airbrush is just as important as selecting the right model. We’ve researched the most trustworthy places to purchase quality airbrushes that won’t disappoint beginners.
Reputable Online Retailers
SprayGunner stands out as a specialized airbrush retailer with excellent customer service and a wide selection of beginner-friendly models like the Harder & Steenbeck Ultra and Evolution series. Amazon offers convenience and competitive pricing on popular entry-level options such as the Iwata NEO CN and Badger Patriot 105, often with fast shipping options. Dedicated hobby websites frequently stock specialized models like the GSI Creos PS-270 and PS-289 that are particularly suitable for miniature painting and model work.
Brick-and-Mortar Options
Local hobby stores provide the advantage of seeing and sometimes testing airbrushes before purchasing, making them ideal for comparing models like the Sparmax HB040 and Gaahleri GHAD-39. Art supply chains often carry beginner-friendly airbrushes and offer staff with practical knowledge who can guide newcomers toward appropriate choices. Specialty painting shops may stock premium options and typically offer valuable advice on selecting between models like the Iwata NEO and Badger Patriot.
What to Look for When Purchasing
Complete kits deliver the best value for beginners, typically including an airbrush, compressor with moisture trap, and basic accessories. Warranty coverage varies significantly between retailers, with some offering extended protection on brands like Harder & Steenbeck and Iwata. Return policies deserve careful attention, especially when purchasing online, as some retailers offer generous 30-day trial periods for airbrushes. Package deals combining airbrushes with compatible compressors (such as Sparmax models) often represent substantial savings compared to buying components separately.
Price Considerations
Entry-level quality airbrushes typically range from $50-$100, with the Iwata NEO CN and Gaahleri GHAD-39 representing excellent value in this bracket. Mid-tier options priced between $100-$200 include the highly regarded Harder & Steenbeck Ultra and Evolution series, offering superior construction and performance. Package deals that include both airbrush and compressor generally start around $150 for basic setups and can reach $300-400 for premium starter kits. Accessories such as cleaning kits, additional nozzles, and needles represent smaller but essential investments that should be factored into your initial budget.


Last update on 2026-02-27 / Affiliate links / Images from Amazon Product Advertising API
How to Progress from Beginner to Intermediate Airbrushing

Master Essential Techniques First
Starting your airbrushing journey requires focusing on foundational techniques before advancing to more complex applications. First, practice applying primer evenly across your projects to create a smooth base. Next, experiment with zenithal highlighting, which involves spraying light colors from above to create natural lighting effects on your models. Many beginners find that consistent basecoating is an excellent way to develop trigger control and learn how paint flow affects coverage. Mastering these basics builds the muscle memory and understanding necessary for more advanced techniques.
Upgrade Your Equipment Strategically
As your skills improve, upgrading to more precise equipment allows for better control and finer detail work. The Harder & Steenbeck Evolution ($100-$200) offers exceptional precision control for artists ready to tackle more intricate projects. Iwata Eclipse HP-CS represents another excellent mid-tier option, providing consistent performance for layering and advanced blending techniques. GSI Creos PS-771 with its 0.3 mm nozzle delivers improved detail capabilities compared to entry-level models. Investing in better equipment should align with your skill progression rather than rushing to purchase professional tools before mastering the basics.
Refine Your Technical Approach
Advancing to intermediate airbrushing requires adjusting both your materials and technique. Use thinner paint mixtures to achieve smoother transitions and prevent clogging in finer nozzles. Lower your PSI settings to between 12-20 for more controlled application, particularly when working on detailed areas. Clean your airbrush meticulously after each session to maintain optimal performance and extend the life of your equipment. Regular maintenance becomes even more critical as you work with finer nozzles that are more susceptible to clogging from paint residue.
Explore Intermediate Techniques
Building on your foundation, begin practicing freehand gradients to create smooth color transitions. Try working with stencils to add complex patterns and textures to your projects. Experiment with masking techniques to create sharp lines and defined areas of color that elevate your work. Attempt color modulation to add depth and visual interest to flat surfaces. These intermediate techniques expand your creative possibilities while reinforcing the fundamental skills you’ve already developed.
Invest in Supporting Accessories
Improving your setup with the right accessories makes progression significantly easier. A quality moisture trap prevents water contamination that can ruin fine finishes. Quick-release connectors allow for efficient switching between different airbrushes during complex projects. Multiple paint cups in varying sizes give you flexibility for different paint quantities and quick color changes. These supporting tools remove common frustrations and technical limitations, allowing you to focus more on developing your artistic skills rather than fighting with equipment limitations.
Choosing the Right Airbrush for Your Specific Craft
Finding your perfect starter airbrush doesn’t need to be overwhelming. We’ve covered everything from budget-friendly options to premium kits that’ll grow with your skills. Remember that proper maintenance and troubleshooting knowledge are just as important as the tool itself.
The ideal beginner airbrush combines ease of use with room for skill development. We recommend starting with a gravity-fed dual-action model with a versatile 0.3mm nozzle for the best initial experience.
Don’t forget to invest in essential accessories like a quality compressor and cleaning supplies. With the right equipment and care routine you’ll be creating impressive airbrush work in no time.
Happy airbrushing!
Frequently Asked Questions
What is airbrushing and how does it work?
Airbrushing is a technique that uses compressed air to spray paint or other media for detailed work. It works by passing compressed air through the airbrush body, which then atomizes and propels the paint onto the surface. This method allows for precise control over paint application, making it ideal for fine details, smooth gradients, and consistent coverage that would be difficult to achieve with traditional brushes.
What’s the difference between single-action and dual-action airbrushes?
Single-action airbrushes control only the amount of air, with paint flow preset manually. Dual-action airbrushes allow you to control both air and paint simultaneously – pressing down releases air, while pulling back controls paint flow. While dual-action has a steeper learning curve, it offers much better precision and control, making it the recommended choice for beginners serious about developing their skills.
Should beginners choose gravity-fed or siphon-fed airbrushes?
Beginners should typically choose gravity-fed airbrushes. They use gravity to feed paint into the airflow, requiring less air pressure and providing better control with finer details. They’re also easier to clean and maintain. Siphon-fed models have their advantages for larger projects, but gravity-fed airbrushes like the Iwata Neo or Badger Patriot 105 offer the best combination of ease of use and performance for newcomers.
What nozzle size is best for beginners?
A 0.3mm nozzle size is ideal for beginners as it offers the best versatility. This middle-ground size can handle most applications – it’s small enough for reasonable detail work but large enough to provide good coverage without frequent clogging. While smaller nozzles (0.2mm) offer finer detail and larger ones (0.5mm) provide better coverage, the 0.3mm strikes the perfect balance for someone learning the craft.
What compressor features should beginners look for?
Beginners should look for oil-free compressors with adjustable PSI (15-30 PSI range), a moisture trap to prevent water contamination, and relatively quiet operation. A tank-equipped compressor is preferable as it provides consistent air pressure without pulsing. Features like auto-shutoff and compact size are also beneficial. Most quality starter kits include suitable compressors with these essential features.
How much should beginners expect to spend on a quality airbrush?
Beginners can expect to spend $50-$100 for quality entry-level airbrushes, $100-$200 for mid-tier options with better components, and $200+ for premium models. Complete starter kits with compressors typically range from $80-$250 depending on quality. Budget options under $50 exist but may have durability issues. Remember to factor in additional costs for accessories, cleaning supplies, and paints when budgeting.
What maintenance routine is essential for airbrushes?
Essential maintenance includes: cleaning immediately after each use by running thinner through the airbrush; performing weekly deep cleaning by disassembling and scrubbing components; using properly thinned paints to prevent clogs; regular lubrication of moving parts with airbrush lubricant; proper storage in a dust-free environment; and inspecting nozzles and needles for damage. Consistent maintenance prevents most common problems and extends your airbrush’s lifespan.
How can I fix a clogged airbrush?
To fix a clogged airbrush, first increase air pressure to 30-40 PSI and run airbrush cleaner through it. If that fails, disassemble the airbrush and soak the nozzle, needle, and paint passage in appropriate cleaner. Use a cleaning brush or nozzle reamer for stubborn clogs, being careful not to damage delicate parts. For extremely stubborn clogs, consider an ultrasonic cleaner. Prevent future clogs by properly thinning paints and cleaning after every use.
What causes sputtering or inconsistent spray patterns?
Sputtering or inconsistent spray patterns are typically caused by improper paint thinning, dried paint in the nozzle, damaged needle tips, incorrect air pressure, or loose nozzle connections. To fix this, ensure your paint is properly thinned to a milk-like consistency, thoroughly clean the airbrush, check for needle damage, adjust air pressure (usually 15-25 PSI works best), and tighten any loose components. Also verify your compressor is providing consistent air flow.
When should beginners upgrade their airbrush equipment?
Beginners should consider upgrading when they’ve mastered basic techniques like smooth basecoats, simple gradients, and basic control exercises. Signs you’re ready include: feeling limited by your current equipment’s precision, experiencing consistent control over paint application, understanding proper thinning ratios, and maintaining your equipment effectively. This typically happens after 6-12 months of regular practice. Consider upgrading to models like the Harder & Steenbeck Evolution or Iwata Eclipse for improved performance.