Looking to transform a blank wall into something spectacular? We’ve gathered the most inspiring photo wall ideas that’ll turn your space from boring to breathtaking in no time. Whether you’re a minimalist or love eclectic designs, there’s a perfect photo display waiting to showcase your precious memories.
We believe your home should tell your story, and what better way than through carefully curated images? From geometric arrangements to salon-style galleries, the possibilities are endless. These photo wall ideas aren’t just decorative elements—they’re conversation starters that add personality and warmth to any room. Let’s explore how to create a stunning visual impact that reflects your unique style and cherished moments.
10 Gallery Wall Layouts That Transform Empty Spaces
1. The Classic Grid
A symmetrical grid layout creates an organized display that works beautifully in formal spaces. Arrange identical frames with equal spacing between them for a clean, cohesive look. This timeless approach is perfect for family photos, vacation memories, or a series of related images. Maintaining consistent spacing is key to achieving that polished, gallery-like aesthetic that transforms plain walls into sophisticated showcases.
2. Salon-Style Cluster
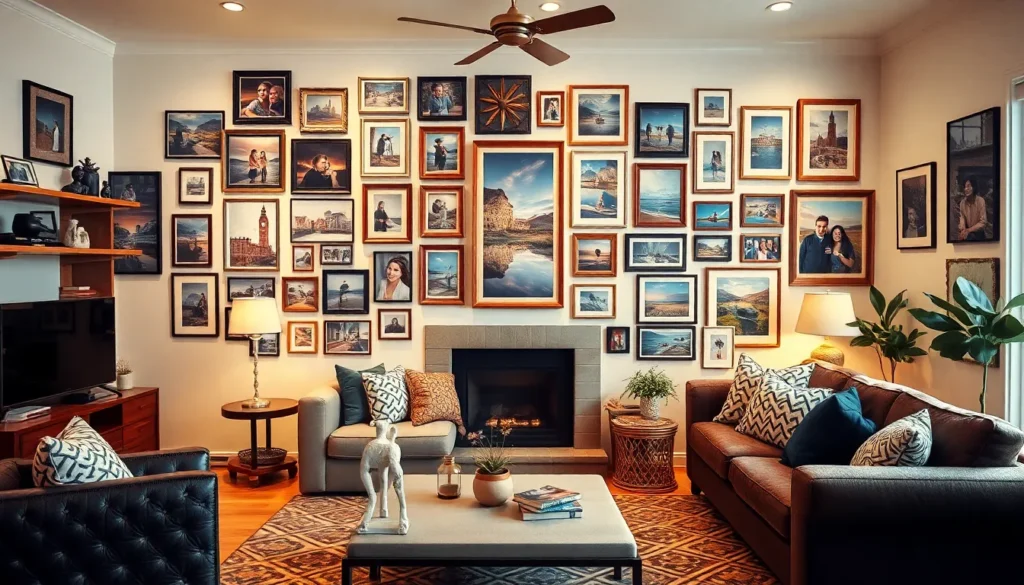
The salon-style arrangement embraces creative chaos with frames of varying sizes placed in an organic cluster. Start with your largest piece as an anchor, then build outward with smaller frames. This eclectic approach allows for endless personalization and works particularly well in living rooms or creative spaces. Your collection can grow organically over time, making it perfect for those who love to continuously add new pieces.
3. Horizontal Line
A simple horizontal line of frames creates a streamlined look that’s ideal for hallways, above sofas, or along stairwells. Position frames at eye level for the most impact, keeping the bottoms aligned for a clean appearance. This straightforward layout works wonderfully with panoramic photos or a series of images that tell a sequential story. We recommend maintaining consistent frame styles for this arrangement to enhance its elegant simplicity.
4. Floor-to-Ceiling Display
Dramatic floor-to-ceiling gallery walls make a bold statement in rooms with high ceilings. Fill the entire wall space with frames of various sizes, creating a stunning focal point that draws the eye upward. This maximalist approach works beautifully in entryways, living rooms, or home offices. The vertical emphasis adds height to your space while showcasing an extensive collection of art and photographs.
5. Around a Focal Point
Building a gallery around existing architectural features transforms them into integrated design elements. Position frames around doorways, windows, televisions, or fireplaces to create a cohesive look. This clever arrangement acknowledges your room’s structure while adding personality through carefully placed images. Leave about 3-4 inches between the focal point and your nearest frames to create visual breathing room.
6. Floating Shelves Gallery
Layered photo displays on floating shelves offer flexibility and depth to your wall design. Arrange frames of different heights along shelves, allowing some to lean against the wall while others stand independently. This relaxed approach allows for easy swapping of images without rehanging frames. Consider painting your shelves the same color as your wall for a sophisticated, built-in appearance.
7. Geometric Pattern
Create visual interest with frames arranged in deliberate geometric shapes like diamonds, hexagons, or triangles. Map out your design on paper first, then transfer the pattern to your wall using painter’s tape as a guide. This contemporary approach feels fresh and artistic, perfect for modern interiors or creative spaces. The unexpected arrangement transforms ordinary photos into a striking art installation.
8. Monochromatic Collection
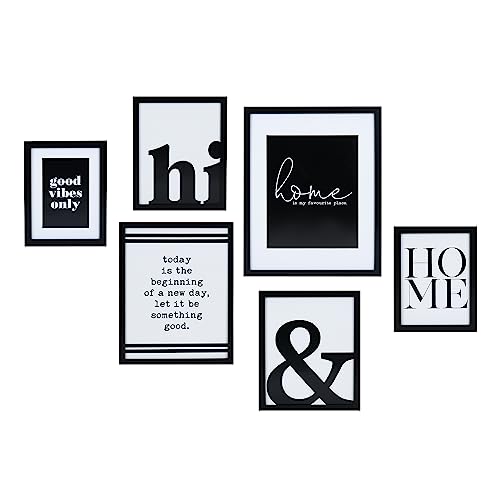
A collection of images unified by a single color theme creates sophisticated visual harmony. Choose photos with similar color tones or convert images to black and white for a cohesive look. This approach works beautifully with matching frames for formal spaces or varied frames for more casual areas. The color consistency creates a powerful visual impact while allowing the content of your images to shine.
9. Corner Gallery
Extend your photo display around corners to create a three-dimensional effect that embraces architectural transitions. Start hanging frames a few inches from the corner on each wall, gradually spreading outward. This unexpected approach makes use of often-ignored spaces while creating visual flow between rooms. Corner galleries work particularly well in open-concept homes or to unify connected spaces.
10. Asymmetrical Balance
Create ever-changing tension with an intentionally unbalanced arrangement that still feels harmonious. Place larger, heavier pieces toward the bottom and lighter elements toward the top, distributing visual weight evenly across the display. This contemporary approach feels artistic and thoughtful while allowing for maximum creativity. Your eye should move naturally across the entire composition without getting stuck in any one area.


Creating a Family Timeline: Chronological Photo Displays

A chronological photo display transforms your ordinary wall into a visual family history book. This thoughtful arrangement captures your family’s journey through time, showcasing growth and change in a meaningful sequence.
Multi-Generation Photo Trees
Family trees come alive when you transform them into stunning wall displays that honor your heritage. Arrange portraits of ancestors and descendants in a tree-like structure to visually represent your family’s lineage across generations. This approach requires some research to ensure everyone is placed in their correct position within the family hierarchy. Puzzle-piece frames work wonderfully in these displays, symbolizing how each family member fits together to create the complete picture of your family history. The visual impact of seeing multiple generations side by side creates a powerful storytelling element that sparks conversations about family connections and shared traits.
Year-by-Year Growth Galleries
Documenting your family’s annual progress creates a fascinating visual timeline that celebrates milestones and developments. Select one representative photo from each year to create a chronological gallery that shows how children grow, relationships evolve, and family dynamics change over time. Interchangeable frames offer fantastic versatility, allowing you to easily update photos as your family continues to grow and change. For maximum impact, maintain consistency with frame colors or styles while varying the sizes of photos to create visual interest. This approach works particularly well in hallways or along staircases, where the linear progression naturally guides viewers through your family’s journey.
When arranging chronological displays, consider using frames of identical color or style to create a unified look even though varying photo sizes. For a more ever-changing and modern approach, metal strips with magnets offer flexibility for showcasing color photos in an asymmetrical pattern that can easily evolve over time. Getting children involved in the process by using temporary washi tape “frames” makes this a family project everyone can participate in while creating a meaningful display.


Mixing Frames and Mediums for a Dynamic Photo Wall

Creating a truly captivating photo wall means going beyond basic frame arrangements and exploring diverse materials and styles. By combining different elements, you’ll transform a simple display into a conversation piece that reveals your personal aesthetic.
Combining Frame Styles
One of the most effective ways to create visual interest is using a mix of large and small frames in varying materials. Wood frames add warmth and a natural element, while metal frames contribute a contemporary edge. Glass frames bring elegance and lightness to your arrangement. This combination of sizes and materials creates depth and dimension, making your photo wall more visually compelling and ever-changing.
For maximum impact, try arranging frames in a way that balances the different styles throughout the display. You can create a focal point with larger frames surrounded by smaller complementary frames. This approach ensures your photo wall appears thoughtfully curated rather than randomly assembled.
Incorporating Multiple Mediums
Your photo wall doesn’t need to be limited to photographs alone. Blending photos with prints, sketches, paintings, or other artistic elements creates a gallery-like display with greater visual complexity. Consider adding textile pieces, small sculptures that can be wall-mounted, or even dimensional items like preserved botanicals in shadow boxes.
This multi-medium approach tells a richer story and showcases different aspects of your personality and interests. The varying textures and dimensions will make your wall more captivating and provide multiple points of visual interest for viewers.
Vintage and Modern Frame Combinations
An eclectic mix of vintage and modern frames adds tremendous character to your photo wall. Ornate antique frames paired with sleek, minimalist modern frames create a compelling visual contrast that highlights both the frames and their contents. This juxtaposition makes each piece stand out while creating an overall cohesive look.
Creating a themed arrangement can help maintain unity within this diverse approach. Group similar frames together in sections or create a pattern that alternates between vintage and modern styles. You might arrange vintage frames in the center with modern frames radiating outward, or vice versa. This intentional organization prevents the display from appearing chaotic while still embracing the charm of mixing different eras.
Incorporating Art Prints Among Photos
Art prints provide perfect contrast to personal photographs, elevating your display from a simple memory wall to a curated art installation. Abstract pieces can complement family portraits, while industry prints might enhance travel photos. The variety creates a more sophisticated overall look while allowing you to incorporate artwork you love alongside cherished memories.
Thematic integration ensures your art prints and photos tell a cohesive story. For instance, pair beach vacation photos with coastal art prints or wedding photos with romantic illustrations. The art pieces can serve as visual punctuation between groups of related photos or as central anchoring elements around which photos are arranged.
Color harmony plays a crucial role when mixing photos and art. Select art prints that incorporate colors found in your photographs, or choose frames for your art that match those used for your photos. A consistent color palette across different mediums creates a sense of unity even when the subjects and styles vary significantly. Well-coordinated colors make the entire display feel intentional and professionally designed.

Travel-Inspired Photo Walls That Tell Your Journey

Transforming your travel memories into captivating wall displays allows you to relive adventures daily. We’ve compiled creative ways to showcase your journeys through thoughtfully arranged photo collections that tell your unique travel story.
Storytelling through Sequences
Chronological arrangements create a visual narrative of your adventures. Position your photos in the order they were taken to guide viewers through your journey from start to finish. Include diverse images capturing everything from transportation moments to breathtaking vistas and authentic interactions with locals. This sequential approach transforms your wall into an immersive storybook that invites others to experience your travels step by step.
Themed Clusters
Group similar photos together to create visually cohesive sections that highlight exact aspects of your travels. Dedicate areas to stunning landscapes, architectural marvels, or candid portraits captured during your adventures. This organizational method creates natural visual rhythm while making each photograph’s unique qualities more apparent. Viewers can appreciate the thematic connections between images while enjoying the distinct character of each location.
Incorporating Elements
Enhance your photo displays with authentic travel ephemera to add dimension and context. Ticket stubs, postcards, maps, and brochures positioned strategically among your photographs create a multi-layered story that goes beyond images alone. These tangible souvenirs provide cultural context while adding texture and authenticity to your visual narrative. The combination of photos and physical mementos creates a rich, immersive display that engages multiple senses.
Destination-Themed Clusters
Create dedicated wall sections that celebrate exact locations from your travels. Showcase iconic landmarks alongside hidden gems from particular countries or cities, highlighting both famous attractions and personal discoveries. Paris collections might feature both Eiffel Tower shots and quaint neighborhood cafés that captured your heart. This focused approach allows viewers to deeply connect with each destination through your personal lens.
Organize your photos based on activities experienced during your travels rather than locations. Group hiking adventures from different countries together, or create culinary collections featuring market visits and memorable meals across destinations. This activity-centered approach reveals your travel priorities and passions while creating visually cohesive groupings that transcend geographic boundaries. Viewers discover not just where you’ve been, but how you prefer to experience the industry.
Map-Centered Memory Displays
Transform a industry map into the centerpiece of your travel photo wall using pushpins to mark visited destinations. Each pin serves as both achievement marker and reference point for surrounding photographs. This comprehensive display showcases your global footprint while providing geographic context for your adventures. Viewers can immediately grasp the scope of your travels while appreciating exact moments captured in each location.
Position photographs strategically around a large central map, aligning each image with its corresponding geographic location. Connect photos to their map positions using subtle lines or color coordination to create an intuitive visual system. This integrated approach maintains geographic accuracy while transforming abstract map locations into vivid personal experiences. The resulting display functions as both art installation and educational tool.
Complete your map-centered display with complementary travel-themed decorative elements. Vintage globes, antique luggage tags, compass designs, or inspirational exploration quotes enhance the adventurous atmosphere of your photo wall. These thoughtful additions reinforce the travel theme while adding visual interest to spaces between photographs. The combination creates a comprehensive celebration of wanderlust that inspires future journeys.

Geometric Pattern Photo Arrangements for Modern Homes

Geometric patterns bring a contemporary edge to photo displays, creating visually striking arrangements that complement modern interiors. These structured layouts add architectural interest while showcasing your favorite images in an organized yet creative way.
Hexagon and Triangle Layouts
Hexagonal arrangements create ever-changing, organic shapes that work beautifully for displaying clustered family photos or abstract art pieces. Lightweight hexagon frames made from materials like plywood or metal can be arranged in honeycomb patterns to achieve a sophisticated mid-century modern aesthetic. Triangle layouts provide angular contrast when combined with hexagons, adding visual interest to your wall design. Position smaller triangular frames around central hexagons to emphasize important focal points and create a cohesive geometric pattern. This combination offers flexibility while maintaining a structured appearance that draws the eye and creates conversation-starting wall art.
Symmetrical Grid Designs
Grid-based arrangements offer visual harmony through their precise alignment and clean lines. For minimalist interiors, square or rectangular frames in monochromatic finishes such as black, white, or metallic work particularly well. Maintain consistent spacing of 2-3 inches between frames for a polished look, and align the center points at eye level (approximately 57-60 inches from the floor). Larger grid formations like 4×4 make impressive statement walls in living rooms, while smaller configurations such as 2×3 work perfectly above console tables or in hallways. Color coordination is essential—try matching frame colors to dominant tones in your existing décor for a cohesive look throughout your space.
For successful implementation, consider incorporating floating shelves with geometric patterns to intersperse photos with plants and decorative objects. Varying frame scales by mixing 8×10″ with 5×7″ frames creates depth while retaining geometric precision. Material choices matter too—frameless photo mounts made from acrylic or adhesive-backed materials align beautifully with minimalist geometric murals, while matte-black metal frames complement abstract 3D wall designs perfectly.

Statement-Making Oversized Prints as Focal Points

Large-format photographs instantly transform ordinary walls into gallery-worthy displays. These oversized prints serve as powerful anchoring elements that draw the eye and establish the mood of your entire space.
Design Element
Oversized prints work as stunning centerpieces in any photo wall arrangement. Select a large, impactful image that resonates with your personal style—whether it’s a vibrant industry that captures a memorable vacation, a family portrait that showcases your loved ones, or an abstract piece that complements your décor. The size alone makes these prints impossible to ignore, turning them into conversation starters and room definers. Position your statement piece at eye level to maximize its visual impact and ensure it receives the attention it deserves.
Arrangement
Balance is key when working with oversized prints in a gallery wall. Place smaller frames strategically around your centerpiece to create visual harmony and draw even more attention to the focal print. Try arranging complementary smaller images that share color tones or thematic elements with your statement piece. This creates a cohesive look while maintaining the hierarchical importance of your oversized print. For added interest, vary the distance between surrounding frames to create rhythm in your arrangement while keeping the oversized print as the undeniable star of your display.
Black and White Portrait Walls
Black and white photography offers timeless sophistication that transcends design trends. Converting your favorite portraits to monochrome instantly elevates them to fine art status, creating a consistent aesthetic even though varying subject matter. Family photos, candid shots, and professional portraits all unite under this classic treatment, allowing the emotions and expressions to take center stage without color distractions.
Frame variety adds essential visual interest to black and white displays. Mix thin metal frames with chunky wooden ones or sleek frameless presentations to create depth and texture within your monochromatic theme. The contrast between frame styles compensates for the limited color palette, creating a richly layered visual experience that draws viewers in to examine each photograph individually.
Your arrangement can follow either structured or eclectic patterns depending on your personal style. A symmetrical grid offers formal elegance, while a more scattered approach creates casual warmth. Regardless of pattern, maintaining consistent black and white processing across all images ensures your portrait wall remains sophisticated and cohesive.
Nature Panoramas That Captivate
Panoramic nature photography creates breathtaking visual impact when displayed across wall space. Breaking a single panoramic image into multiple frames creates a dramatic wide-angle display that transforms ordinary rooms into immersive environments. This technique works particularly well with landscapes that feature horizontal drama—mountain ranges, ocean horizons, or sprawling cityscapes all translate beautifully to this format.
Perfect alignment becomes crucial when working with divided panoramas. Each segment must hang at precisely the same height with consistent spacing to maintain the illusion of a single continuous image. The smallest misalignment can disrupt the panoramic effect, so careful measurement and installation are essential for successful execution of this style.
Consider the viewing distance when planning your nature panorama display. Larger rooms benefit from wider separations between frames, creating a more dramatic effect when viewed from across the space. In smaller areas, tighter spacing maintains the cohesive panoramic effect while accommodating spatial limitations. The resulting display adds both depth and drama to any room, turning ordinary walls into windows to spectacular natural vistas.
Seasonal Rotating Photo Displays for Fresh Inspiration

Keeping your photo walls fresh and relevant throughout the year doesn’t require a complete redesign—just a strategic approach to seasonal updates. By incorporating rotating displays, you’ll maintain visual interest while showcasing different memories as the seasons change.
Easy-Swap Frame Systems
Interchangeable frames make seasonal updates effortless and stress-free. Magnetic backing systems allow you to refresh your displays without dealing with wall damage or complicated remounting. IKEA’s RIBBA series offers modular rails that make rearrangement simple, letting you slide frames along tracks to create new configurations. Design expert Emily Henderson recommends leaner frames or grid systems specifically for those who enjoy frequent gallery refreshes. Mixing frame materials adds wonderful texture while maintaining adaptability—try combining wooden frames with metallic options for visual contrast. These versatile systems work particularly well for high-traffic areas where you’ll appreciate the ability to quickly switch between seasonal themes or update with recent photos.
Holiday-Themed Photo Collections
Dedicated holiday photo walls create festive focal points that celebrate special occasions throughout the year. Creating cohesive color palettes enhances the thematic appeal—consider red and green accents for Christmas displays or soft pastels for Easter arrangements. Shutterfly’s popular layouts incorporate themed prints, typography, and memorabilia alongside photos to enhance the storytelling aspect. Pinterest users frequently showcase innovative ideas like displaying vintage holiday postcards, family tradition timelines, or travel snapshots from seasonal vacations. Quarterly swaps reflecting seasonal changes work beautifully, especially when incorporating thematic elements like autumn leaves framing fall portraits or floral accents complementing spring images. These themed collections serve as conversation starters while keeping your space feeling current and celebrating the unique character of each season.
Staircase Photo Walls That Maximize Unused Space

Staircases offer prime vertical real estate that’s often overlooked in home design. We’ve found that these ascending spaces create natural viewing galleries where your cherished photos can tell compelling visual stories as family and guests move between floors.
Ascending Timeline Arrangements
Timeline displays transform your staircase into a narrative journey through your most precious memories. Family photo timelines work beautifully when organized with graduation or yearly markers that guide viewers through your history. Travel enthusiasts can showcase destinations in the order they were visited, creating a visual passport that climbs with each step. Growth progression shots—such as annual school photos or birthday portraits—make particularly powerful displays when arranged to ascend with the staircase, physically representing the passage of time. These chronological arrangements add depth and meaning to what might otherwise be a purely functional transitional space.
Mixed-Size Cascading Displays
Creating visual interest along your staircase requires thoughtful variation in frame sizes and arrangements. Professional designers recommend using 3-5 different frame dimensions, typically with 16×20″ as your largest anchor pieces and 5×7″ frames for smaller accents. Asymmetrical clusters with 2-3″ spacing between frames create a ever-changing yet organized appearance that draws the eye upward. Balance plays a crucial role in these arrangements—distribute visual weight by alternating between heavier and lighter elements throughout the display. A mixed-media approach combining traditional frames with canvas prints, decorative objects, and even wall sconces adds textural dimension that flat arrangements often lack. Consider incorporating woven baskets or other three-dimensional elements to break up the monotony of flat frames.
For installation, wrapping paper templates with grid lines offer precise layout planning, replacing older methods that used kraft paper. Beehive hangers provide micro-adjustment capabilities for perfect alignment, while gorilla hooks offer secure support for heavier frames. Renters can achieve the same stunning effects using Command Strips for a damage-free solution that won’t forfeit security deposits.
Interactive Photo Walls With Changeable Elements

Photo walls don’t have to be permanent installations. We’ve gathered some innovative answers that allow you to frequently update your displays while maintaining an aesthetic appeal.
Magnetic Photo Boards
Magnetic photo boards offer unparalleled flexibility for those who love to refresh their visual storytelling. These versatile display options feature metal backings that allow photos to be easily repositioned or replaced using magnets. Perfect for ever-changing spaces like children’s rooms or home offices, magnetic boards eliminate the need for nails, frames, or adhesives that can damage your walls. You can arrange many photos in different configurations, creating new layouts whenever inspiration strikes. Many homeowners appreciate how these boards accommodate growth and change, especially in displaying a child’s artwork or school photos throughout the year.
Clipboard and Wire Hanging Systems
Clipboard and wire hanging systems deliver a modern, industrial aesthetic while offering exceptional adaptability. These systems typically feature sturdy wires stretched horizontally across a wall with clips or miniature clipboards that securely hold your photos in place. Updating your display becomes a simple matter of unclipping one photo and replacing it with another. Wire systems work particularly well for seasonal photo rotations or displaying recent adventures without committing to permanent frames. The exposed hardware creates a distinctive visual element that complements contemporary interior designs. For maximum impact, we recommend installing multiple rows of wires at different heights, allowing you to create a full wall of easily changeable memories.


Low-Budget DIY Photo Wall Ideas With Major Impact

Creating stunning photo displays doesn’t have to drain your wallet. These budget-friendly ideas deliver maximum visual impact while keeping costs minimal.
Washi Tape Photo Frames
Washi tape offers an incredibly affordable way to create custom frames directly on your walls. Simply arrange your favorite photos in a grid or asymmetrical pattern, then outline them with colorful washi tape to create instant frames. This versatile method allows for easy repositioning whenever inspiration strikes, with no damage to your walls. You can create different frame styles by layering tape colors or creating geometric patterns around your photos for added visual interest. The temporary nature of washi tape makes it perfect for renters or anyone who likes to frequently update their displays.
Recycled Material Photo Displays
Transform everyday items into extraordinary photo displays with repurposed materials that add character while reducing waste. Wooden pallets can be sanded, painted, and mounted to create rustic backdrops for attaching photos with clothespins or binder clips. Vintage windows provide natural frame divisions for a collection of images, while old shutters offer textured surfaces perfect for displaying multiple photos. Cork squares from thrift stores make excellent bulletin-style display boards that can be arranged in creative patterns on your wall. These recycled material displays not only showcase your photos but also tell a sustainability story through their repurposed elements, adding an industrial-chic aesthetic to any room without the premium price tag.
Peel-and-Stick Gallery Walls
Affordable adhesive products revolutionize the way we create gallery walls without nails or wall damage. Products like Mixtiles allow you to mount photos with removable adhesive backing, making them ideal for renters or frequent redecorators. These peel-and-stick options eliminate the need for tools or precise measuring, enabling you to create professional-looking displays in minutes. You can arrange and rearrange your layout as often as desired without leaving holes or marks on your walls. The flexibility of these systems makes them perfect for evolving collections that grow with your experiences and memories.
Photo Hoop Display
Create a showstopping circular gallery for under $20 using a basic hula hoop as your frame. Spray paint the hoop in your favorite color, then hang it from the ceiling using fishing line for an airy, floating effect. Attach mini clothespins around the circumference to clip photos in a radial pattern, creating a ever-changing display that catches attention. Adding faux flowers or greenery between photos introduces texture and seasonal elements to your display. This budget-friendly project works beautifully in children’s rooms, nurseries, or as a striking statement piece above a bed or sofa.
Plaid Fabric Backdrop
Fabric backdrops offer warmth and texture while providing a base for an ever-changing photo collection. Stretch plaid fabric across a section of wall using thumbtacks at the corners for a cozy, cabin-inspired foundation. Photos can be pinned directly to the fabric, allowing for easy updates without damaging your walls. Placing thin cork squares behind the fabric creates a pinboard effect without visible holes in your precious memories. This method combines the softness of textile with the practicality of a bulletin board, creating a rustic aesthetic that complements both casual and formal spaces.
Color-Blocked Frames
Breathe new life into mismatched thrifted frames with coordinated paint colors that create visual harmony. Paint frame edges in complementary hues like pastel orange and blue to transform a hodgepodge collection into a cohesive display. The beauty of this approach lies in the contrast between unified colors and varied frame sizes and styles. Mixing frame orientations adds ever-changing visual interest while maintaining color cohesion. This technique allows you to create expensive-looking custom frames for pennies, proving that creativity often trumps budget when designing impactful wall displays.
Floating Triptychs
Split panoramic images across three frames to create dramatic wall art that tricks the eye into seeing an expensive art installation. Print sections of your favorite industry or family photo separately, or use a simple tile-cutting method to divide one large print. The visual continuation across frames creates depth and movement, drawing viewers into the scene. This approach works particularly well with landscapes, cityscapes, or wide group photos that tell a complete story. Your guests will never guess this statement piece cost a fraction of similar gallery installations.
Photo Ledge Gallery
Install inexpensive floating shelves to create flexible display platforms that minimize wall damage and maximize creative freedom. These ledges allow you to layer frames of different heights and sizes, creating depth without the need for precise hanging measurements. Small decorative objects can be interspersed among your photos to add personality and visual breaks. The greatest advantage of ledge galleries is the ability to effortlessly swap images without tools or wall repairs, perfect for seasonal updates or showcasing new memories. This system grows with your collection while maintaining a polished, designer-approved aesthetic that belies its affordable price point.
Conclusion: Personalizing Your Space With Photo Memories
Photo walls are more than decorative elements—they’re storytellers that breathe life into our homes. Whether you opt for a classic grid arrangement or an eclectic mix of frames and mediums we’ve explored these displays transform empty spaces into personal galleries that reflect who we are.
From budget-friendly DIY answers to sophisticated black and white portraits remember that the most successful photo walls speak to your personal aesthetic. The beauty lies in the flexibility to adapt and evolve your displays as new memories are created.
We hope these ideas inspire you to create a photo wall that celebrates your unique journey. Start small if needed but don’t wait to surround yourself with images that bring joy daily. Your walls are waiting to showcase the moments that matter most.
Frequently Asked Questions
How do I create a classic grid photo display?
Arrange identical frames in rows and columns with equal spacing for a symmetrical, polished look. Maintain consistent spacing between frames (typically 2-3 inches) and use a level to ensure perfect alignment. Choose frames in the same style and color for cohesiveness. This timeless arrangement works well in formal spaces and is ideal for showcasing a series of similar-sized photos.
What is a salon-style cluster display?
A salon-style cluster is an eclectic mix of different sized frames arranged organically on a wall. Start with a larger anchor piece in the center, then build outward with various frame sizes and styles. Maintain 1-2 inches between frames and extend the arrangement in all directions. This free-form layout creates visual interest and works perfectly for displaying diverse collections of photos and memories.
How can I create a photo display in a hallway?
Use a horizontal line layout with frames aligned at eye level (approximately 57-60 inches from the floor). Choose frames of similar heights but varying widths for visual interest. Maintain consistent spacing and extend the display along the length of the hallway. This streamlined arrangement creates a gallery effect that draws viewers through the space while maximizing narrow wall areas.
What is a floor-to-ceiling photo display?
A floor-to-ceiling display covers an entire wall from floor to ceiling with frames. Start by arranging larger pieces at eye level, then build up and down. Vary frame sizes and orientations while maintaining consistent spacing. This dramatic arrangement creates a statement wall that transforms the entire room and works particularly well for showcasing extensive photo collections in living rooms or home offices.
How can I incorporate architectural features into my photo wall?
Create a display around focal points like fireplaces, windows, or built-ins by positioning frames to complement these features. Maintain balanced spacing on both sides and consider the visual weight of each piece. Use the architectural element as an anchor, arranging photos to enhance rather than compete with it. This integration creates a cohesive design that feels intentional and harmonious.
What are floating shelves galleries and how do I create one?
Floating shelves galleries feature photos displayed on wall-mounted shelves rather than hung directly on walls. Install 2-4 shelves at different heights, then layer frames of varying sizes, leaning them against the wall. This flexible arrangement allows for easy rearrangement and seasonal updates without damaging walls, making it perfect for renters or those who like to frequently change their displays.
How do I create a geometric pattern with my photos?
Arrange frames in deliberate shapes like diamonds, hexagons, or triangles. Start by sketching your desired pattern on paper, then transfer measurements to the wall using painter’s tape. Maintain consistent spacing between frames and use templates to ensure precise alignment. This contemporary approach creates visual impact while adding architectural interest to plain walls, especially in modern interiors.
What is a monochromatic photo collection?
A monochromatic collection features images unified by a single color palette or theme. Select photos with similar tones (all black and white, sepia, or a specific color dominance). Frame selection can vary, but consider maintaining either all matching frames or frames in complementary finishes. This approach creates visual cohesion and dramatic impact, perfect for creating a sophisticated, curated look.
How do I create a corner gallery display?
Extend your photo arrangement around a corner to create a three-dimensional effect. Start by treating each wall individually, then create a bridge between them with frames positioned at the corner junction. Maintain consistent spacing and consider visual balance across both walls. This approach maximizes underutilized corner spaces while creating an immersive viewing experience that draws the eye around the room.
What makes an asymmetrical balance photo wall work?
An asymmetrical balance arrangement distributes visual weight evenly despite using different sized frames in an irregular pattern. Place larger pieces toward the bottom and outer edges, with smaller frames toward the center and top. Maintain consistent spacing and step back frequently to assess overall balance. This dynamic approach feels both intentional and organic, offering creative freedom while maintaining a harmonious composition.
How can I create a family timeline photo display?
Arrange family photos chronologically in a horizontal or vertical line. Use consistent frame styles but consider varying sizes for visual interest. Add small dates or descriptive tags below each frame. This storytelling approach transforms your wall into a visual family history book that highlights growth and changes over time, making it perfect for hallways, staircases, or family rooms.
What are multi-generation photo trees?
Multi-generation photo trees display family portraits arranged in a tree-like structure. Start with older generations at the top/roots and branch downward to younger family members. Use connecting elements like decals, painted lines, or actual branches to visualize relationships. This meaningful arrangement honors heritage and helps children understand family connections, especially effective in family gathering spaces.
How can I incorporate travel memorabilia into photo walls?
Create travel-themed displays by grouping photos with memorabilia like tickets, maps, and postcards. Frame smaller items alongside photos or use shadow boxes for three-dimensional objects. Consider organizing by destination or chronologically to tell your travel story. Add a central map with pushpins marking visited locations connected to corresponding photo clusters for an interactive, educational display that celebrates your adventures.
What are low-budget ways to create photo walls?
Create affordable photo displays using washi tape to frame prints directly on walls, repurpose materials like wooden pallets or vintage windows as frames, or use peel-and-stick products for damage-free installations. DIY projects like embroidery hoop frames, plaid fabric backgrounds, or color-blocked paper frames add personality without significant expense. These budget-friendly approaches deliver visual impact while allowing for creativity and frequent updates.
How do I create a black and white portrait wall?
Select portraits with strong compositional elements and convert them to black and white with consistent processing. Use a mix of frame styles in complementary finishes (all black, all white, or mixed metals) while maintaining similar matting. Arrange frames with 2-3 inches between them in a grid or salon-style cluster. This timeless approach creates sophistication and emotional impact while unifying diverse images.
What are seasonal rotating photo displays?
Seasonal displays feature interchangeable photos that reflect current holidays or seasons. Use easy-swap systems like magnetic frames, clip rails, or photo ledges that facilitate quick updates. Create themed collections (summer adventures, holiday gatherings) that can be stored and rotated throughout the year. This approach keeps your walls fresh and relevant while celebrating seasonal memories and current family activities.