I’ve learned that painting concrete walls right means nine deliberate steps—skip even one and you’ll face peeling paint months later. Start by vacuuming and power-washing your surface, then repair any cracks with concrete filler. Check moisture levels stay below 5% before priming. Apply quality primer, mask edges, then build opacity with two or three thin coats rather than one thick one. Remove tape at 45 degrees, add a clear topcoat, and inspect after 48 hours. Each step builds on the last, and the specifics behind them matter tremendously.
Clean the Concrete Surface Thoroughly
You’d be surprised how many people skip the cleaning step, but I’m here to tell you it’s the most important part of the entire project. I learned this the hard way when I rushed through surface prep on my garage walls.
Start with a vacuum to remove loose debris, then use a power washer for embedded grime and green discoloration. This concrete cleaning phase takes patience. After that, inspect carefully for cracks, chips, or holes. I fill these with concrete filler, letting it cure completely according to instructions.
Here’s what separates pros from amateurs: waiting for a moisture-free surface. Skip this step at your own risk. Debris removal and proper drying prevent paint failure later. Your finished walls depend on this foundation work.
Repair Concrete Wall Damage Before Painting
Now that your concrete walls are clean and dry, it’s time to tackle any damage you’ve found. I’ll inspect carefully for cracks and holes, then use a concrete patch kit or MissPompadour Filler to repair them. I apply the patching material smoothly, following the product’s curing instructions—usually 24 hours. Once cured, the surface feels solid and even.
Next, I apply sealer across the repaired areas to protect against moisture damage. This step matters because water can seep into cracks later. After the sealer cures completely, I’m ready for primer. A quality concrete primer—either open-pored or stain-blocking—creates an even base for paint adhesion. This preparation work is thorough and professional, setting me up for a durable paint job.
Check Concrete Wall Moisture Before Priming
Before I apply primer, I’ve got to check if moisture is hiding in the concrete—and this step is non-negotiable if I want the paint to stick around. I learned this the hard way when my first project peeled within months. The moisture test keeps levels below 5%, which is necessary for proper adhesion and a lasting finish.
| Step | Action |
|---|---|
| 1 | Clean the wall thoroughly |
| 2 | Rinse completely with water |
| 3 | Allow 48 hours drying time |
| 4 | Use a moisture meter on concrete wall |
| 5 | Check reading stays under 5% |
I use a calcium chloride test kit for accuracy. If moisture’s too high, I wait longer. This patience during priming prep prevents costly failures later and keeps my adhesion strong.
Apply a Quality Concrete Primer

Once I’ve confirmed the concrete’s moisture is below that critical 5% mark, I’m ready to prime. I apply a quality concrete primer evenly across the entire surface, and this step matters. The primer improves adhesion, especially on porous concrete that absorbs everything, and it blocks stains from bleeding through later.
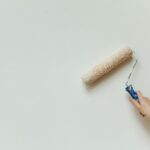
I start with edgework using a synthetic bristle brush, creating clean lines where walls meet trim. Then I use a ½–¾ inch nap roller for larger areas, which distributes the primer smoothly without oversaturating the concrete.
I’ve learned the hard way that skipping primer causes peeling paint months later. Following the manufacturer’s drying time recommendations isn’t optional—I wait the full time before applying topcoats. This patience protects my finished work.
Mask Adjacent Areas and Cut In Edges
Have you ever noticed how a messy paint line can ruin an otherwise perfect wall? I’ve learned that masking adjacent areas is an effective technique for professional results.
Before I start painting, I use painter’s tape to protect trim, fixtures, and anything I don’t want painted. This simple step improves the outcome.
Next comes my edgework strategy:
- Apply painter’s tape along trim lines and corners, pressing firmly so paint doesn’t bleed underneath
- Use a synthetic bristle brush to cut in around edges with steady, controlled strokes
- Complete all edgework before rolling to prevent lap marks and maintain consistent coverage
I cut in about two to three inches from corners and edges. This creates a clean boundary that frames my roller work perfectly. When I’m done with edgework, I can roll confidently knowing my edges are already handled.
Roll Paint in 3×3-Foot Sections to Maintain Wet Edges

I’ve found that rolling in 3×3-foot sections works well for getting a professional finish on concrete walls. You’ll want to work methodically across each section, slightly overlapping with the one before it, which helps blend everything together so you don’t end up with those frustrating lap marks. The key is keeping your roller lightly loaded and rewetting your edges as you move along, which prevents the paint from drying out and creating visible lines between sections.
Maintaining Wet Edge Technique
Because staying ahead of drying paint is what separates a smooth, professional finish from one covered in lap marks, you’ll want to work in 3×3-foot sections and keep each area wet as you paint. I’ve learned that this rolling technique requires focus and rhythm.
Here’s what I do to maintain that critical wet edge:
- Reload my ½–¾ inch nap roller frequently so I’m applying consistent coverage within each section
- Roll in one direction, then back-roll lightly to smooth the texture and create uniform thickness
- Re-cut and feather edges as I progress, preventing visible boundary lines between damp and dry zones
The key is staying intentional. I move methodically across the wall, overlapping slightly between sections. This prevents dry lines and maintains consistent color flow. When I rush, lap marks appear. When I stay deliberate, results look professional.
Section-by-Section Application Method
Now that you’ve got your edges cut clean and your roller loaded, it’s time to tackle the main wall surface in organized sections. I divide my walls into 3×3-foot squares, working systematically from top to bottom. This approach keeps my primer and coats looking uniform across the entire surface.
I load my roller with paint and apply it in an “M” or “W” pattern within each section, then fill it in without lifting. I move immediately to the adjacent section while the edge stays wet, blending the new paint smoothly with what I’ve just applied. This overlapping technique prevents lap marks that ruin your finish.
I complete all edgework first, then roll each section thoroughly. I apply 2–3 coats this way, letting each dry completely between applications. This method produces quality results on concrete walls.
Apply a Second (or Third) Coat for Full Opacity
I’ve found that one coat rarely cuts it on concrete—you’ll almost always need a second coat, and sometimes a third, to get that solid color you’re after. Before you roll that second coat though, I always wait for the first one to dry completely, which usually takes 4-8 hours depending on the paint brand and humidity, because rushing it causes peeling and uneven coverage. Once that coat’s dry, I inspect the wall under good lighting to spot any thin streaks or pale areas, then I apply my second coat using the same 3×3-foot sections, and if I still see through spots after that dries, a third coat takes care of it.
Building Color Coverage Properly
When you’ve rolled that first coat and it’s finally dry, you’ll notice the concrete showing through in spots—and that’s exactly what should happen. I learned this the hard way on my garage project. That bare concrete peeking through means you’re ready for coat number two. Here’s how I build proper color coverage:
- Apply your second coat of concrete paint using the same rolling technique, maintaining a wet edge to prevent lap marks
- Allow this coat to dry completely per manufacturer guidelines before deciding if you need a third
- Thin the first coat by 5–10% with water if your concrete is rough, which improves adhesion and leveling
Two coats usually deliver full opacity for most concrete paint products. Three coats provide rich, professional color that lasts for years.
Drying Time Between Coats
Once that second coat’s on the wall, patience becomes your best tool—and I’ve learned that rushing this step costs you in the long run. Most concrete paint needs 24 hours between coats to form properly. Check your product label, though, since drying times range from 4–24 hours depending on the brand and conditions.
I always wait the full time because skipping ahead risks peeling later. Rough or highly absorbent concrete sometimes dries faster, so adjust accordingly. Apply thin coats rather than one thick one—this builds better color coverage and durability.
After your final coat, let everything cure completely. I avoid walking on freshly painted concrete for at least 24–72 hours. This patience protects your work and provides maximum durability.
Detecting Thin Spots Effectively
How do you know if your first coat’s actually covering the concrete evenly? I inspect the wall using raking lighting—angling my flashlight across the surface to catch any imperfections. Thin spots become obvious under this technique.
Process for full opacity:
- Examine each section carefully after the first coat dries completely per manufacturer instructions
- Target problem areas with a second coat, focusing on spots that look uneven or translucent
- Apply a third coat if needed to achieve uniform color and complete coverage
I’ve learned that building thin coats prevents lap marks and peeling better than one thick application. After each coat dries, I walk the wall in different lighting angles. This inspection process takes time, but it’s how I get consistent results. Your final surface will look polished and durable.
Remove Tape Carefully to Preserve Clean Lines

The moment you’ve finished your final coat, you’re probably eager to see your crisp painted lines—and that’s when tape removal matters most. I’ve learned that patience is your best friend here. Let your final coat cure fully according to the manufacturer’s timeline before touching that tape. When you’re ready, peel back the tape at a 45-degree angle, keeping it taut so you don’t pull up fresh paint. This angle prevents edge lifting and protects your hard work. If bleed-through sneaks past your preparation, don’t worry—just re-tape slightly beyond the line and touch up with a fine brush. Taking these careful steps will help you achieve those clean lines you’ve been envisioning.
Protect Your Finish With a Clear Topcoat
Sealing your painted concrete walls with a clear topcoat is like adding invisible armor to your work. This final step keeps your paint job looking fresh for years.
A clear topcoat is invisible armor for your painted concrete walls, keeping your work looking fresh for years.
After your base paint fully cures, it’s time to apply your clear sealer. Here’s what to do:
- Wait for the manufacturer’s recommended curing time before applying topcoat
- Choose a clear sealer with proper adhesion to your paint type—epoxy or acrylic
- Apply thin, even coats to prevent drips and maintain consistent protection
The topcoat resists wear, reduces chipping in high-traffic areas, and makes cleaning easier. Periodic resealing maintains color integrity and surface durability. You’re protecting the effort you’ve invested, and that matters.
Touch Up and Inspect After 48 Hours
Once your clear topcoat has fully cured for 48 hours, do a careful walkthrough of your entire project. Inspect every concrete wall systematically, looking for missed spots, uneven edges, and fresh drips. You’ll catch lap marks where two sections meet, and that’s normal.
Check that all coats are fully cured before touching anything up. This prevents lifting or peeling underneath layers. When you find small issues, patch cracks first, then apply thin touch-up coats only to affected areas. This blending technique keeps everything looking consistent.
Document every touched-up spot and the timing. This record helps you plan future maintenance within the paint’s recommended recoat window. Taking these steps now saves frustration later and keeps your concrete walls looking professionally finished.