Turn on your gas valve fully, then locate the black knob labeled PILOT, ON, and OFF. Switch it to PILOT and hold it down while igniting the flame with a lighter or electronic ignitor. Keep holding for 20–30 seconds so the thermocouple warms up. Release the knob—your pilot should stay lit with a steady blue flame about 2–3 inches tall.
Turn the knob to ON to ignite your main burner. If your pilot won’t stay lit, you’ll want to explore what’s actually going wrong.
Step 1: Turn On the Gas Supply Before Lighting the Pilot

Before you can light your fireplace’s pilot, you’ll need to turn on the gas supply—and this is actually the most important step because without gas flowing to your fireplace, nothing else will work. I learned this the hard way when I rushed past finding the main gas valve.
Locate your gas valve, typically positioned near the fireplace’s base or control panel. Turn it left to its maximum position until you feel resistance stop. If your valve is remote or inline, check the manufacturer’s guidance for the proper open orientation.
Before proceeding with ignition, perform necessary safety checks. Smell around the fireplace for any gas odors or leaks. If you detect anything unusual, secure the valve immediately and contact a professional. Once safety is confirmed, you’re ready for the next step.
Step 2: Set the Pilot Control Knob to Pilot

Now that you’ve got the gas supply turned on, it’s time to locate and adjust the pilot control knob. Look for a black knob labeled with PILOT, ON, and OFF settings. You’ll find it either directly on the valve behind your log set or on the front panel. I always check mine twice to make sure it’s currently set to OFF before proceeding. Once you’ve located it, turn the knob to the PILOT position. This setting allows gas to flow to the pilot while you’re lighting it. Some control knobs require you to press inward while turning. If your gas fireplace has an extended pilot knob or spark ignitor attached, have it ready. This step puts you in control of the lighting process.
Step 3: Ignite the Pilot Using Your System’s Ignition Method

Now I’ll help you light that pilot, and I’ve found there are two main ways to do it depending on what your fireplace has. If your system has an electronic ignition, you’ll press and hold the knob while clicking the piezo spark button repeatedly until you see a flame appear at the pilot area. If you don’t have electronic ignition, I’d use a long lighter or long match instead, holding it near the pilot opening while keeping that knob pressed in.
Electronic Ignition Systems
Because your fireplace likely has either a Proflame 1 or Proflame 2 electronic ignition system, you’ll use a remote control or wall panel to light the pilot instead of manually igniting it. Simply press the on button, and your pilot light should ignite within a few seconds, followed by the main burner. If it doesn’t work on your first attempt, wait a few seconds and try again—this gives the system time to communicate properly. I’ve found that checking your remote’s batteries makes a difference; weak batteries prevent the ignition sequence from starting. Whether you have an IPI system that lights the pilot each use or a CPI model that keeps it burning constantly, the re-light ignition process remains straightforward and reliable.
Manual Ignition Methods
What’s the best way to get that pilot lit? Push your control knob to the PILOT position and hold it steady. If you’re using a piezo ignitor, press the button repeatedly while keeping the knob held down. You’ll generate sparks toward the pilot until it catches. Don’t have a piezo ignitor? A long BBQ lighter or fireplace match works from the pilot port.
Once your pilot flame appears, keep holding that knob for 20–30 seconds. This warms your thermocouple, which allows gas to keep flowing after you release it. Slowly release the knob and watch carefully—your pilot flame should stay lit. Only then turn the knob to the ON position. You’ve successfully lit your fireplace pilot.
Step 4: Hold the Pilot Knob for 30 Seconds

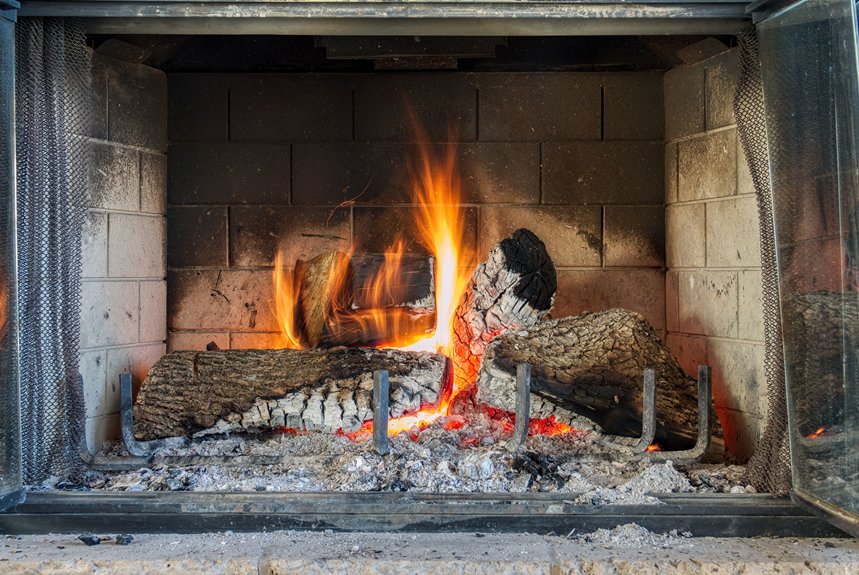
Once you’ve lit the pilot, keep that knob pressed in for a full 30 seconds. During this hold, you’re letting the thermocouple heat up enough to do its job properly. Think of the thermocouple as your safety guardian. When it gets warm, it signals the gas valve to keep fuel flowing to your pilot flame. If you release the knob too early, the thermocouple won’t register enough heat, and your flame will die the moment you let go. Watch for a steady, blue pilot flame about 2–3 inches tall. That’s your sign everything’s working. I’ve seen people rush this step and end up relighting repeatedly. Don’t skip those 30 seconds. Your fireplace depends on this warm-up period.
Step 5: Release the Knob and Confirm the Pilot Stays Lit

Step 5: Release the Knob and Confirm the Pilot Stays Lit
Now comes the moment of truth—slowly release that control knob and watch closely. This is where you’ll discover if your thermocouple is working properly. As you ease off, keep your eyes on the flame. A functioning thermocouple will signal the gas valve to stay open, keeping that pilot burning steady.
| What to Watch | What It Means |
|---|---|
| Blue flame | Healthy pilot |
| 2–3 inches long | Proper height |
| Steady burn | Thermocouple working |
| Flame flickers | Potential issue |
| Pilot extinguishes | Thermocouple failing |
If your pilot stays lit, proceed with confidence. If it goes out, don’t worry. Press and hold that knob again for 20–30 seconds to rewarm the thermocouple. Sometimes it just needs extra time. When repeated attempts fail, that’s your signal to call a professional who can inspect both the thermocouple and gas valve properly.
Step 6: Adjust the Knob to Ignite the Main Burner
With your pilot flame burning steady and blue, you’re ready to fire up the main burner.
Turn the gas flow knob clockwise to the ON position. Here’s what happens next:
Turn the gas flow knob clockwise to the ON position and watch as your main burner ignites with a steady whoosh.
- The main burner ignites as gas flows through the system
- You’ll hear a slight whoosh sound when ignition occurs
- The logs or burner flames appear within seconds
- Blue flames indicate proper gas flow and combustion
On millivolt or manual valves, let the knob settle into place first. This signals readiness before operating the burner. Watch carefully as the main burner catches fire. If it doesn’t ignite, stop immediately. Verify your pilot light remains steady and bright. Don’t force anything. Consult your manual or contact a professional if problems persist.
Step 7: Pilot Won’t Ignite or Won’t Stay Lit? Here’s What to Do

What do you do when your pilot light refuses to cooperate? Troubleshooting systematically saves time and frustration.
| Issue | Solution |
|---|---|
| Pilot won’t ignite | Check gas supply is on, main valve open, no leaks |
| Pilot lights but dies | Thermocouple may be faulty; needs replacement |
| Weak or fluttering flame | Insufficient gas pressure or blockage in line |
| Intermittent ignition | Hold knob in pilot position 20–30 seconds |
When you’re holding that knob, you’re heating your thermocouple so it detects the flame properly. If piezo ignition fails repeatedly, switch to a longer match or grill lighter following safety precautions. Electronic ignition systems (IPI/CPI) sometimes need remote re-ignition or professional service. Patience with your ignition method, combined with these checks, resolves most pilot light issues before calling a technician.